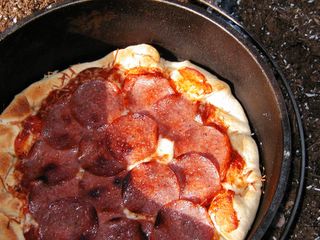
Pizza and a salad make a satisfying camp meal.

A Saturday afternoon campfire in the forest has been a Karoly tradition for more than 20 years. Now that my oldest daughter in married and the youngest is staying with her grandmother, my son and I use the time to talk, read the Bible and write.
The campfire is the centerpiece of the outing year-round. By mid-July, when fire restrictions hinder campfires, we'll move our campfire ritual to one of the organized campgrounds in Eldorado National Forest.
Why a Campfire, You Ask?
A campfire is an inseparable part of the camping. I'm sure you can argue that modern campers don't need campfires. After all, we have camp stoves to cook dinners, waterproof tents to capture body heat and the stars to gaze at for entertainment. Campfires are as much a part of the camping experience today as they were when my grandparents were featured on the masthead the San Francisco Chronicle (Monday, July 10, 1922).
A campfire gives warmth. And that's more than heat. For me there's nothing more comforting than to sit around a crackling fire reading my favorite book and gazing at the stars. Camping without a campfire is like a day without food. It refreshes the soul after a strenuous day camping.
I can think of dozens of reasons for burning a campfire. To name a few: campfires give warmth (the heat kind), provide light for that book, burn garbage and food scraps, give a beacon when you walk into the forest to take a leak and hasten the decomposition process so necessary for a lively forest.
A campfire also tests your wilderness skills. Try starting a fire after three days of rain. If you can accomplish it without the aid of lighter fluid (sorry, gasoline's out), you're a pro.
Building the Campfire
I build my campfires in the Sierra Nevada high country with downed pine, fir and cedar. To me, it's a waste of precious dollars to haul oak firewood or charcoal briquettes to the campground. I instead rely of the natural resources of the forest. (In wet conditions I carry dried and cured firewood start the fire.)
You must pay constant attention to your Dutch oven when using softwood. Pine, fir and cedar burn quickly. Watch your oven and replenish the coals often.
Don't focus on oven temperature. Just pile hot coals from the campfire onto the oven with a gloved hand and a pair of 14-inch tongs. Experience and the five senses guide you to approximate the correct number of coals.
Build a campfire that's four to five times the volume of the Dutch oven and burn it down to a glowing bed of coals. This'll take approximately 30 to 45 minutes with pine, fir and cedar.
I've learned from many poorly-cooked dishes that you can never have too many campfire coals. Continue feeding the campfire so you will finish the dish with sufficient heat. Feed the fire as long as you have a plentiful supply of firewood.
QUICK DUTCH OVEN PIZZA
I've given instructions for charcoal briquettes in case you prefer them to campfire coals.

The pizza is ready to slice. I prefer to slice the pizza in the oven. Just take care not to gouge the cast iron with your knife. When forming the pizza, the trick is to fit a square peg into a round hole. Form the 9- x 12-inch piece of pizza dough as neatly as possible in the round Dutch oven.

1 (13.8-ounce) package Pillsbury classic pizza crust
1/2-3/4 cup prepared pizza sauce
3/4 cup grated mozzarella cheese
15-20 salami or pepperoni slices
Toppings as desired
Use a 12-inch Dutch oven for this recipe. Lightly grease the oven and pre-heat with 10 briquettes underneath and 19 on top of the oven. Remove lid and set aside. Unroll pizza dough and mold it evenly into the oven. Return lid and bake pizza crust for 8 minutes, until crust sets and is about halfway done.
Remove lid and set aside. Spread pizza sauce over the dough, leaving a 1-inch margin. Sprinkle cheese over sauce. Arrange pepperoni slices on sauce. Add favorite toppings as desired. Return lid and bake for an additional 6 to 11 minutes. Baking time will vary greatly depending on heat and weather conditions.
Remove the oven from the heat when the crust has browned and the cheese and meat is bubbling. Cool pizza about 5 minutes. Cut into 6 slices, being careful not to cut into the cast iron. Remove slices with spatula or pie server.

I didn't take any oil to grease the Dutch oven. My solution was to render fat from three slices of Italian salami.


No comments:
Post a Comment