
Showing posts with label Dutch oven. Show all posts
Showing posts with label Dutch oven. Show all posts
Saturday, August 26, 2017

Saturday, November 12, 2016
Sicilian-style cast iron skillet pizza

After testing a recipe from the Serious Eats website two weeks ago, cast iron skillet pizza sounded good. I wanted a recipe that I can use at my summer job and when camping. This recipe will serve both purposes. It can either be baked in a half-sized (13x18-inch) sheet pan or in two large cast iron skillets (10- to 12-inch diameter).
The camp edition of the pizza can be baked with charcoal briquettes or inside the home oven. While this recipe uses a stand mixer (I use a Kitchen Aid 5-quart mixer), the Serious Eats website has instructions for hand-mixing the dough. You can use an inverted Dutch oven as well. I will post hand-mixing instructions when I get a chance.
The full-sized (18x26-inch) sheet pan will be used for the camp. It takes six to eight sheet pan pizzas for each 100 campers. Pizza is often pared with honey barbecued chicken wings, pasta salad and a loaded salad bar. We typically feature cheese pizza, pepperoni pizza, vegan pizza and a meat-lover's pizza.
 |
| I proofed the dough on the picnic table on the patio. The skillet in the foreground in a Lodge No. 12. The other one is a Wagner 1891. My wife and I purchased the Wagner in the early 1980s when we were first married. |
 |
| The pizza is ready for toppings. Each skillet pizza needs 1/4- to 1/2-cup sauce, 3 to 4 ounces shredded cheese and 2 to 4 ounces meat (if used). I added a bunch of sauteed spinach to both pizzas. Four ounces sliced chicken sausage with feta and spinach was used on the larger pizza. |
 |
| You have to pile the charcoal briquettes to achieve a close approximation of 550 degrees F. Lighting 10 extra briquettes will give you extra heat should you need it. |
 |
| Finished pizzas. The crust could've been a bit more crisp. The smaller pizza is vegetarian. |
 |
| Sheet pan pizza prepared from the same recipe. I will use this recipe to bake pizza in full-sized (18x26-inch) sheet pans for Oakland Feather River Camp, where I am the executive chef. Four sheet pans yield 96 slices. |
This recipe requires two large cast iron skillets, 10- to 13-inches in diameter. Match each skillet to the rimmed Dutch oven lid (or camp-style Dutch oven) that fits best. The 12-inch lid will fit the smaller skillet while the larger skillets will require the 14-inch lid.
To bake in a rimmed 13x18-inch half-sized sheet pan, pour remaining oil (in second paragraph of instructions) into a half sheet pan. Place dough on sheet pan and let rise as directed. About 30 minutes before baking, preheat home oven to 550 degrees with rack in the middle position. Proceed to stretch dough to the sides and corners of the pan, as directed. Double toppings and bake 15 to 20.
This recipe was adapted from the SeriousEats.com website.
17-1/2 ounces bread or all-purpose flour
2 teaspoons kosher salt
1 teaspoon instant yeast
1/2 cup olive oil, divided
12-1/4 ounces room temperature water
Combine flour, salt, yeast and 2 tablespoons oil in the bowl of a stand mixer. Whisk to combine. Add water and mix on medium speed until it comes together and no dry flour remains. Increase speed to medium-high and mix until the dough is stretchy and smooth, about 6 minutes. The dough should stick to the bottom of the bowl but pull away from the sides.
Divide oil between 2 cast iron skillets and spread over surface with hands. Divide dough in half and place one piece in each. (Add slightly more dough to the larger skillet when using mismatched pans.) Rub top surface with oil until thoroughly coated. Cover with plastic wrap. Allow to rise at room temperature until dough has spread out to nearly touch each rim of each skillet, about 2 hours.
Carefully remove plastic wrap. Using oiled hands and being as gentle as possible to maintain air bubbles, push and stretch dough into corners of each skillet by pressing out from the center and lifting and stretching it beyond the rim of each skillet. The dough should pull back until the skillet is just filled with dough.
Light 45 to 60 charcoal briquettes in a charcoal chimney about 30 minutes before the dough is ready. One lid is needed since you will bake the pizzas one at a time. For 550 degrees, use around 45 briquettes (30 on lid and 15 under skillet) on the 12-in camp-style Dutch oven lid. The 14-inch lid requires around 60 briquettes (40 on lid and 20 under skillet).
Top each pizza with about 1/3- to 1/2-cup sauce, 3 to 4 ounces shredded mozzarella cheese, plus additional toppings as desired. Place the first skillet on trivet. Place the lid from a Dutch oven on top of the skillet. Bake with charcoal briquettes for 550 degrees until bottom is crisp and top surface is bubbling, 15 to 30 minutes. Repeat for second skillet. Allow to cool at room temperature for 5 minutes. Slice as desired.
Thursday, October 29, 2015
Throwback Thursday: How many servings will a 12-inch Dutch oven deliver?
This article was originally posted on Tuesday, March 25, 2008.
The topic of catering large groups often surfaces on Dutch oven discussion boards, like the IDOS forum and Camp-cook.com. Conversation rarely centers on the business side catering. It's the culinary side of feeding large groups that draws most of the attention. Questions about menus, portion sizes, amount to prepare and equipment are among the most common.
The last discussion that I joined in on began with a question from a Dutch oven group in Porterville, California. Dutchin' Dave, a member of the Sequoia Dutch Ovens, asked this question at Camp-cook.com:
 He planned to prepare one recipe in a 12-inch Dutch oven and scoop the cobbler out in 2- to 3-ounce portions. Dave estimated that the his recipe would yield about 15 servings. The results will, of course, depend on the volume of fruit and topping in his recipe.
To feed 225 guests, Dave figures it will take 15 (12-inch) ovens. He believes "approximately 3/4 of them will want dessert." The remaining 25 percent will avoid dessert due to health concerns or personal taste, said Dave.
Number of cobbler servings per No. 12 Dutch oven
Let me answer Dave's question in two parts. I'll address his immediate cobbler question first since that's the main point of his discussion. Then in a couple days, I'll address the broader question of catering large groups out of Dutch ovens.
I always work from volume, not some generalized table of servings per Dutch oven. Most Dutch oven food is semi-liquid or semi-solid. It spoons or ladles out very well. The key is to calculate the volume each Dutch oven holds for a particular dish and divide by the serving size. That's the basic formula for determining portions per Dutch oven.
There are other factors, like toppings and the number of pieces (of meat, chicken, potatoes, etc.) in the pot. It's hard to serve 20 (1-cup) servings out a pot of pork chops and gravy when there's only 15 chops in there to begin with. Toppings will also limit the number of servings. A pot pie or cobbler that's topped with 15 biscuits will only give you 15 servings.
I like to work out of 14-inch oven when cooking for a crowd. They're lighter than 16-inch ovens and holds more than a 12-inch oven. The 14-inch is a happy medium between lugging heavy 16-inchers and having to wrestle lots and lots of 12-inch ovens. I recommend that you locate as many 14-inch ovens as possible.
I don't recommend using deep-style ovens for recipes that use a topping as a key component of the dish. Deeper ovens are best reserved for bread loaves, large cuts of meat and soups, chili and stew.
The problem with baking a cobbler or crisp in a deep-style oven is it can hold a larger ratio of filling to topping. You'll run out of topping long before the filling is gone. The people at the head of the dessert line will get all the topping.
 For the cobbler, I use 2 or 3 (14-inch) Dutch ovens to serve apple crisp to 150 campers. A 14-inch regular oven holds 8 quarts full to the brim. A good working volume is about 2/3 of the oven capacity, or about 5-1/3 quarts of product. Divide that by 1/2-cup into 5-1/3 quarts and you get about 42 servings per 14-inch regular oven. I round to 40. My recipe (below) uses three 14-inch ovens to feed 100 campers.
You can get 50 servings if you push the volume to 6 quarts. Just make sure you leave enough head room for the crisp topping to brown. But remember, to get 50 (1/2-cup) servings per 14-inch oven, you need about 6-1/2 quarts crisp/cobbler in each oven. And don't forget my caution about the filling to topping ratio above.
APPLE CRISP FOR A CROWD
Dutch oven instructions are located in the notes.
FILLING
3 (#10) cans sliced apple
1/2 cup lemon juice
1 tablespoon lemon zest
2-3/4 pounds sugar
8 ounces cornstarch
3 tablespoons ground cinnamon
1 tablespoon salt
TOPPING
3 pounds brown sugar
1-1/4 pound rolled oats
1-1/4 pounds all-purpose flour
1-2/3 teaspoons baking powder
1-3/4 teaspoons baking soda
1 tablespoon salt
2 pounds butter, softened
Arrange 4-1/2 quarts apples in each greased 18x26-inch sheet pan. Sprinkle juice and zest over apples. Combine granulated sugar, starch, cinnamon and salt; sprinkle half over apples in each pan.
Combine brown sugar, flour, baking powder, baking soda, salt and butter or margarine; blend to form a crumbly mixture. Sprinkle an equal quantity of the mixture evenly over apples in each pan.
Using a convection oven, bake at 350 deg F for 30 minutes or until top is bubbling and lightly browned on low fan, open vent. Cut each pan 6 by 9. Serve with serving spoon or spatula.
Yield: 2 sheet pans
Serving ideas: Serve 1 piece or approx 1/2-cup per portion. Acceptability is approx. 100 percent.
NOTES: Use 3 #10 cans sliced apples per 100 portions. Use two 18x26-inch sheet pans per 100 portions. Three lemons will yield 1/2-cup juice. Two pounds flour (total) may be used in place of rolled oats.
For 14-inch Dutch oven, use 1 #10 can of canned apples and a 1/3 the remaining ingredients per oven. This will yield approx 33 (1/2-cup) servings per oven.
The topic of catering large groups often surfaces on Dutch oven discussion boards, like the IDOS forum and Camp-cook.com. Conversation rarely centers on the business side catering. It's the culinary side of feeding large groups that draws most of the attention. Questions about menus, portion sizes, amount to prepare and equipment are among the most common.
The last discussion that I joined in on began with a question from a Dutch oven group in Porterville, California. Dutchin' Dave, a member of the Sequoia Dutch Ovens, asked this question at Camp-cook.com:
Got a problem. We've been asked to do cobbler for 300 folks at a fancy fundraising dinner for our Cancer Camp for children. We're thrilled to do it, but the problem stems from the fact that the majority of our Sequoia Dutch Ovens chapter is already committed to another function and there will only be 4-5 of us left. Under the circumstances, it's going to be critical that our operation run as efficiently and streamlined as possible. We need to figure out how many ovens these 4-5 cooks are going to have to manage and so we need to calculate pretty closely how many servings we can get out of an oven.Dave went on to explain his thought process on the issue. Even though he knows how many servings can be served from a 12-inch regular Dutch oven ("6-18 servings of a 'main dish' or 'to 30' servings of a 'side dish'"), he recognized that the number of servings per pot depends upon the portion size.
 He planned to prepare one recipe in a 12-inch Dutch oven and scoop the cobbler out in 2- to 3-ounce portions. Dave estimated that the his recipe would yield about 15 servings. The results will, of course, depend on the volume of fruit and topping in his recipe.
To feed 225 guests, Dave figures it will take 15 (12-inch) ovens. He believes "approximately 3/4 of them will want dessert." The remaining 25 percent will avoid dessert due to health concerns or personal taste, said Dave.
Number of cobbler servings per No. 12 Dutch oven
Let me answer Dave's question in two parts. I'll address his immediate cobbler question first since that's the main point of his discussion. Then in a couple days, I'll address the broader question of catering large groups out of Dutch ovens.
I always work from volume, not some generalized table of servings per Dutch oven. Most Dutch oven food is semi-liquid or semi-solid. It spoons or ladles out very well. The key is to calculate the volume each Dutch oven holds for a particular dish and divide by the serving size. That's the basic formula for determining portions per Dutch oven.
There are other factors, like toppings and the number of pieces (of meat, chicken, potatoes, etc.) in the pot. It's hard to serve 20 (1-cup) servings out a pot of pork chops and gravy when there's only 15 chops in there to begin with. Toppings will also limit the number of servings. A pot pie or cobbler that's topped with 15 biscuits will only give you 15 servings.
I like to work out of 14-inch oven when cooking for a crowd. They're lighter than 16-inch ovens and holds more than a 12-inch oven. The 14-inch is a happy medium between lugging heavy 16-inchers and having to wrestle lots and lots of 12-inch ovens. I recommend that you locate as many 14-inch ovens as possible.
I don't recommend using deep-style ovens for recipes that use a topping as a key component of the dish. Deeper ovens are best reserved for bread loaves, large cuts of meat and soups, chili and stew.
The problem with baking a cobbler or crisp in a deep-style oven is it can hold a larger ratio of filling to topping. You'll run out of topping long before the filling is gone. The people at the head of the dessert line will get all the topping.
 For the cobbler, I use 2 or 3 (14-inch) Dutch ovens to serve apple crisp to 150 campers. A 14-inch regular oven holds 8 quarts full to the brim. A good working volume is about 2/3 of the oven capacity, or about 5-1/3 quarts of product. Divide that by 1/2-cup into 5-1/3 quarts and you get about 42 servings per 14-inch regular oven. I round to 40. My recipe (below) uses three 14-inch ovens to feed 100 campers.
You can get 50 servings if you push the volume to 6 quarts. Just make sure you leave enough head room for the crisp topping to brown. But remember, to get 50 (1/2-cup) servings per 14-inch oven, you need about 6-1/2 quarts crisp/cobbler in each oven. And don't forget my caution about the filling to topping ratio above.
APPLE CRISP FOR A CROWD
Dutch oven instructions are located in the notes.
FILLING
3 (#10) cans sliced apple
1/2 cup lemon juice
1 tablespoon lemon zest
2-3/4 pounds sugar
8 ounces cornstarch
3 tablespoons ground cinnamon
1 tablespoon salt
TOPPING
3 pounds brown sugar
1-1/4 pound rolled oats
1-1/4 pounds all-purpose flour
1-2/3 teaspoons baking powder
1-3/4 teaspoons baking soda
1 tablespoon salt
2 pounds butter, softened
Arrange 4-1/2 quarts apples in each greased 18x26-inch sheet pan. Sprinkle juice and zest over apples. Combine granulated sugar, starch, cinnamon and salt; sprinkle half over apples in each pan.
Combine brown sugar, flour, baking powder, baking soda, salt and butter or margarine; blend to form a crumbly mixture. Sprinkle an equal quantity of the mixture evenly over apples in each pan.
Using a convection oven, bake at 350 deg F for 30 minutes or until top is bubbling and lightly browned on low fan, open vent. Cut each pan 6 by 9. Serve with serving spoon or spatula.
Yield: 2 sheet pans
Serving ideas: Serve 1 piece or approx 1/2-cup per portion. Acceptability is approx. 100 percent.
NOTES: Use 3 #10 cans sliced apples per 100 portions. Use two 18x26-inch sheet pans per 100 portions. Three lemons will yield 1/2-cup juice. Two pounds flour (total) may be used in place of rolled oats.
For 14-inch Dutch oven, use 1 #10 can of canned apples and a 1/3 the remaining ingredients per oven. This will yield approx 33 (1/2-cup) servings per oven.
Tuesday, October 27, 2015
Barbecued beef shepherd's pie in 14-inch Dutch oven
 |
| Crossing Mother Lode Drive at Mile Post 136.8. |
Since I haven't cooked for the railroad in nearly two years, the crew boss and thought this would be the perfect opportunity to treat the hard-working crew to a Dutch oven lunch. With plenty of room to safely fire charcoal briquettes, I set up my kitchen on the tracks. The first charcoal chimney was fired around 9:30 a.m. The crew enjoyed lunch three hours later.
I wanted to change the lunch entree for this cook date. Over the past 10 years, I have often prepared some form of chili con carne for the railroad crew. For over a week I had been working on a Dutch oven version of shepherd's pie. Instead of a traditional shepherd's pie with lamb, shredded beef chuck road, braised in beer and barbecue sauce formed the protein base. Since the biscuits, cobbler and coffee are crew favorites, I left them on the menu. The menu consisted of:
- Barbecued beef shepherd's pie in 14-inch camp oven
- Cream coleslaw
- Buttermilk biscuits in a 14-inch camp oven
- Mixed berry cobbler in a 12-inch camp oven
- Railroad coffee
 |
| We let the rail cars pass first as they were going to be working the area behind the camera. I set up my firepan and chuckbox between the rails to keep a safe distance from the brush.We don't cook with charcoal on the right-of-way in the summer months due to the fire danger. |
 |
| The first thing I did was to bake buttermilk biscuits. To ease preparation on site, I weighed the dry ingredients and cut in the shortening at home on Thursday. The biscuit mix was stored in the refrigerator to keep the shortening cold. I added the buttermilk and cut large biscuits (3-1/2-inch diameter) once on the railroad. |
 |
| With the biscuits on heat, I turned to the coleslaw, berry cobbler and shepherd's pie, in order. To prepare the meat for the shepherd's pie, I braised a 3-1/2-pound chuck roast in beer and barbecue sauce on Thursday. After cutting the roast into large pieces, I seared them in bacon fat in a cast iron skillet. The braising liquid consisted of 1-1/2 cups IPA beer, 1-1/2 cups barbecue sauce, 1/4 cup chopped parsley, 2 bay leaves and 1 teaspoon dried thyme. The braising liquid was poured over the meat in the skillet. After covering with aluminum foil, it was placed in a 300-degree oven for about 5 hours. Once the meat tender enough to pull, I placed it in a zipper lock bag and in the refrigerator. The braising liquid was strained and placed in the refrigerator as well. |
 |
| As the biscuits were baking in a 14-inch camp oven, I cooked 5 pounds red potatoes in the stockpot. Once mashed, the potatoes would be used as the topping for the shepherd's pie. |
 |
| To prepare the shepherd's pie, I shredded the chuck roast by hand and placed it in the 14-inch camp oven (see picture above with the peas). I then skimmed the fat off of the braising liquid and poured it over the pulled meat, along with 8 ounces frozen peas. Next a thick layer of mashed potatoes was spooned oven the meat and peas. I baked the pie with coals for around 375 degrees until crisp potato peaks had formed and the sauce was buddling, about 45 minutes. I used 1-1/2 rings of charcoal on the lid and 8 coals under the pot. |
 |
| The finished meal. Lunch was served to 8 crew members around 12:30. I was able to send cobbler, biscuits and shepherd's pie home with several crew members. We could've easily fed 12 to 15 with the 3 pots. |
Tuesday, October 13, 2015
Navy bean soup at Upper Blue Lake
Last month I prepared Navy bean soup for my sister and her husband at Upper Blue Lake in Eldorado National Forest. This was the fifth year that Debbie and I joined them at the lake. They camped at the lake several years before us.
In the weeks leading up to the trip, my sister and I coordinate the menu. We split the dinners and breakfasts. Each family is left to its own devises for lunch. I usually pack too much food. My original thought was to prepare Navy bean soup for lunch. The planned meal (sauteed chicken breast with cilantro cream sauce) remained in the cooler.
Since we snacked that day, I suspended a 10-inch Dutch oven over the fire at noon and began the soup. This not the first time I have cooked soup at the lake. In 2011, I prepared split pea soup for our mother, who was camping with us. You can view the recipe and the story behind the recipe.
 |
| To begin the soup, I set the Dutch oven over the cooking fire. After it pre-heated, 6 ounces diced salt pork was rendered in the pot. One diced carrot and 1 diced onion went into the pot next. The vegetables and salt pork were stirred every couple minutes until lightly caramelized. |
 |
| One pound small white beans were added to the pot along with 6 cups cold water. The beans were seasoned with bay leaves, granulated garlic, coarse ground black pepper and cayenne pepper. I added 2 additional cups of water after the beans had cooked three hours. I spent most of the afternoon reading and tending the fire. |
 |
| Around 4 o'clock, I hiked up the mountain to this grove of Lodgepole pine trees. The is situated on a shelf on southern slope of The Nipple, a peak that overlooks Upper Blue Lake. During the hike, I left the soup over a small cooking fire. I added water to the beans and recharged the fire upon my return, about 45 minutes later. |
 |
| The pot of soup was suspended over the fire from on a tripod. I left the lid on the pot to aid in cooking the beans. Given the altitude of 8,100 feet above sea level, it took just over 6 hours to soften the beans to the consistence of soup. The soup was ready to serve around 6 p.m. The convertible fire iron set was built by Campmaster of Mesa, Arizona, in the early 1990s. The iron set can be set up as a bipod or trip pod. |
Wednesday, October 07, 2015
Spicy Dutch oven breakfast strata

Classic breakfast strata consists of cubed or torn bread, layered with shredded cheeses and bound together with whisked eggs. Meat and vegetables are optional. The mountain man breakfast is a common Dutch oven strata in camp.
Then I though why not use the beef taquitos from the freezer as the base? So, a layer of taquitos fit in the bottom of the Dutch oven. After spooning my salsa rachera over the taquitos, a mixture of crumbled chorizo with green chiles and onion went over the top. Ten eggs with cheddar and jack cheeses made up the final layer. After baking with charcoal for 35 minutes, we are ready to eat.
 |
| Cut the taquitos to fit into the Dutch oven. I began by arranging them in the fashion of a wheel spoke, but quickly realized the taquitos would blend into the final dish. Settle on complete coverage, not presentation in this case. |
 |
| Mixing the eggs and cheese together gives you the best distribution of the cheese. Don't worry when the chorizo mixture rises to the surface. It's all good! |
 |
| Let the cooked strata rest for about 10 minutes. Resting allows the proteins and starches to set, making the strata more stable before you cut into it. |
SPICY DUTCH OVEN BREAKFAST STRATA
You will need to cut the taquitos to fit in the Dutch oven.
Arrange them as desired as they will blend into finished dish.
10-12 frozen beef taquitos
1/2 cup salsa
1 tablespoon vegetable oil
1/2 cup diced onion
1 (4-ounce) can diced green chiles
6 ounces pork chorizo, casing removed
10 large eggs
1/2 cup shredded sharp cheddar cheese
1/2 cup shredded Monterrey jack cheese
1/2 teaspoon kosher salt
1/2 cup salsa
1 tablespoon vegetable oil
1/2 cup diced onion
1 (4-ounce) can diced green chiles
6 ounces pork chorizo, casing removed
10 large eggs
1/2 cup shredded sharp cheddar cheese
1/2 cup shredded Monterrey jack cheese
1/2 teaspoon kosher salt
1/4 teaspoon ground black pepper
Lightly oil (or coat with pan spray) a 10-inch Dutch oven.
Arrange beef taquitos in the shape of a wheel spoke. Evenly spoon salsa over the
taquitos.
Heat oil in a heavy skillet over medium-high heat. Sauté onions
and chilies until soft, 2 to 3 minutes. Add chorizo and cook, crumbling with a
spoon, until browned. Drain off excess fat.
Meanwhile, crack eggs into a bowl. Add cheddar and jack cheeses
and season with salt and pepper. Whisk eggs and cheeses until blended.
Evenly pour egg and cheese mixture over taquitos. Place lid on oven.
Bake with coals for 350 degrees until puffed and golden,
about 30 to 35 minutes. Let stand 10 minutes before serving. To serve, cut into
8 pieces. If desired, serve with your favorite hot pepper sauce or salsa and
sour cream on the side.
Saturday, March 07, 2015
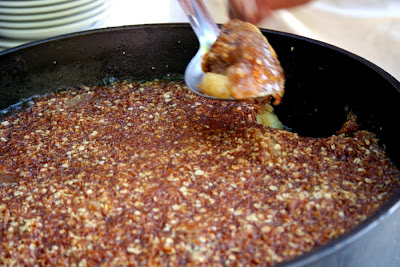
Baked steel cup oats with fresh berries
.jpg)
Several Internet searches led me to baked oatmeal. The idea of its rustic texture, browned with molasses or brown sugar, fascinated me. Baking the oats would add interest and appeal over traditional cooked oatmeal.
Then a culinary student at the Christian Culinary Academy presented individual bowls of baked oatmeal with strawberries last Thursday. The texture was amazing. Rustic and deep brown, her dish was a welcome change from cooked oatmeal. The oatmeal resembled a moist homemade granola.

In the morning, light the charcoal briquettes in a charcoal chimney. Remove the bowl from the cooler, stir and pour into an oiled 10-inch Dutch oven. Brew the morning coffee as the oats bake and you ready yourself for the days activities. By the time everyone awakes, you'll enjoy a rustic breakfast made for the outdoors.
My purchase goof has opened my eyes to a new flavorful way to prepare oats in the morning. I plan to bake larger quantities for Oakland Feather River Camp this summer. Testing for a 12 by 20-inch hotel pan will begin in May. In addition to baked oats in the forest, larger quantities for the camp will enhance the breakfast meal.
Baked steel cut oats with fresh berries
I adapted this recipe from a 2013 blog post at Alexandra's Kitchen. Her recipe includes instructions for baking in individual dishes. My scratch-made syrup stood in for genuine maple syrup. I used a mixture of blueberries and raspberries for the test run.
3/4 cup steel cut oats
1/2 cup slivered almonds
1 teaspoon baking powder
1-1/2 teaspoons ground cinnamon
1/2 teaspoon kosher salt
1 cups fresh berries
2 cup milk
1/3 cup maple syrup
1 large egg
3 tablespoons unsalted butter, melted and cooled slightly
2 teaspoons vanilla extract
In a small bowl, mix together oats, nuts, baking powder, cinnamon and salt. In a second bowl, whisk together milk, syrup, egg, butter and vanilla. Pour the milk mixture over the oat mixture. Stir to combine. Store mixture in refrigerator or camp cooler overnight.
In the morning, scatter berries into a lightly oiled 10-inch camp-style Dutch oven. Pour milk-oat mixture over berries. Bake with coals for 375 degrees (18 coals under oven and 6 on lid) for 60 minutes or until the oats are firm and milk thoroughly absorbed. Bake several additional minutes for a crispier crust. Let cool for a few minutes before serving.
Serve with fresh berries and cream or milk. Makes about 6 servings.
Sunday, February 15, 2015
Dutch oven meatloaf
Though meatloaf reaches back to Roman times, the invention of the hand-cranked meat grinder hastened its acceptance as classic comfort food. Topped a tangy ketchup glaze, meatloaf is the perfect centerpiece for the traditional American meal. For many, it brings back memories of one or two fat slices, served with a heap of mashed potatoes.
I prefer a traditional loaf, one made with sauteed aromatics, finely ground bread crumbs, ketchup or milk, eggs and two or three ground meats. Baking the meatloaf in a camp-style Dutch oven lets you enjoy a good meal in camp. If desired, you can mix the meat in the home kitchen, shape it into a round loaf and place in the ice chest for the trip to the campground.
Enjoy ...
DUTCH OVEN MEATLOAF
Most recipes (including this one) instruct you to avoid over-mixing the meatloaf. While giving the loaf a thorough mix is essential, mixing it longer than needed will yield a tough loaf. Mix the loaf just to the point where each ingredient is developed into a smooth texture. This will help the load hold together.
1 tablespoon olive oil
1/2 cup onion, finely chopped
1/2 cup carrot, finely grated
3 cloves garlic, minced
1 pound ground beef
1 pound ground pork
1/3 cup bread crumbs
1/2 cup ketchup
2 large eggs, lightly whipped
3/4 teaspoon kosher salt
1/2 teaspoon ground black pepper
Pinch cayenne pepper (optional)
Glaze:
1/4 cup ketchup
2 tablespoons packed brown sugar
1 teaspoon prepared mustard
1/2 teaspoon Worcestershire sauce
Pinch nutmeg
Pre-heat a 12-inch camp-style Dutch oven over a bed of charcoal briquettes or camp burner. Pour in olive oil. Add onion, carrot and garlic. Saute until onions are translucent. Do not brown vegetables. Place vegetables in a medium bowl and cool slightly. Wipe Dutch oven with paper towel.
Add beef, pork, bread crumbs, ketchup, eggs, salt, pepper and cayenne to bowl with vegetables. Mix with your hands, until thoroughly blended. Do not over mix. Mold meat mixture into a round, about 7 to 8 inches in diameter. Place into a 12-inch camp-style Dutch oven.
Combine glaze ingredients in a small bowl. Brush glaze over meat loaf. Place lid on oven. Bake with coals for 350 degrees (approximately 8 charcoal briquettes under oven and 16 to 20 on lid) about 60 minutes, or until internal temperature reaches 165 degrees. Rest 10 minutes before slicing.
I prefer a traditional loaf, one made with sauteed aromatics, finely ground bread crumbs, ketchup or milk, eggs and two or three ground meats. Baking the meatloaf in a camp-style Dutch oven lets you enjoy a good meal in camp. If desired, you can mix the meat in the home kitchen, shape it into a round loaf and place in the ice chest for the trip to the campground.
Enjoy ...
 |
| Mold the meat mixture into a seven- to eight-inch round inside the 12-inch camp-style Dutch oven. If desired, shape it into a traditional rectangular loaf. |
 |
| Many meatloaf recipes instruct you to brush the glaze on in the last 20 to 30 minutes of baking to avoid burning. I find that the moist environment in the Dutch renders this step unnecessary. Brush the glaze on the uncooked meatloaf. |
 |
| Asparagus sauteed in butter and garlic and mashed Klondike Rose potatoes were served alongside Dutch oven meatloaf. |
Most recipes (including this one) instruct you to avoid over-mixing the meatloaf. While giving the loaf a thorough mix is essential, mixing it longer than needed will yield a tough loaf. Mix the loaf just to the point where each ingredient is developed into a smooth texture. This will help the load hold together.
1 tablespoon olive oil
1/2 cup onion, finely chopped
1/2 cup carrot, finely grated
3 cloves garlic, minced
1 pound ground beef
1 pound ground pork
1/3 cup bread crumbs
1/2 cup ketchup
2 large eggs, lightly whipped
3/4 teaspoon kosher salt
1/2 teaspoon ground black pepper
Pinch cayenne pepper (optional)
Glaze:
1/4 cup ketchup
2 tablespoons packed brown sugar
1 teaspoon prepared mustard
1/2 teaspoon Worcestershire sauce
Pinch nutmeg
Pre-heat a 12-inch camp-style Dutch oven over a bed of charcoal briquettes or camp burner. Pour in olive oil. Add onion, carrot and garlic. Saute until onions are translucent. Do not brown vegetables. Place vegetables in a medium bowl and cool slightly. Wipe Dutch oven with paper towel.
Add beef, pork, bread crumbs, ketchup, eggs, salt, pepper and cayenne to bowl with vegetables. Mix with your hands, until thoroughly blended. Do not over mix. Mold meat mixture into a round, about 7 to 8 inches in diameter. Place into a 12-inch camp-style Dutch oven.
Combine glaze ingredients in a small bowl. Brush glaze over meat loaf. Place lid on oven. Bake with coals for 350 degrees (approximately 8 charcoal briquettes under oven and 16 to 20 on lid) about 60 minutes, or until internal temperature reaches 165 degrees. Rest 10 minutes before slicing.
Thursday, November 06, 2014
Throwback Thursday: Lightening cake with pears and almonds
I posted this recipe from a cookbook of my grandmother's in September 2005.
 I suspect that this recipe was called lightning cake because it’s made “lightning fast.” The original cake is a brownie-like dessert with a sugar-cinnamon topping. I adapted it by folding diced Bartlett pears and sliced almonds into the batter. And a used a crumb topping made from oatmeal, flour and sugar.
All meals at grandma Bertha Karoly’s Mill Valley home were good. We often enjoyed a Sunday afternoon roast leg of lamb with roasted potatoes and German red cabbage. Although, I don’t remember many desserts, I’m certain I ate any number of sweets at her table.
This recipe is adapted from Any One Can Bake, published by Royal Baking Powder Company in 1927. My grandmother purchased this book on April 18, 1927 when my father was 17 months old.
LIGHTNING CAKE WITH PEARS AND ALMONDS
Use your favorite crumb topping for the cake. My favorite recipe follows.
1/2 cup milk
3 eggs
1/2 cup melted butter
1-1/2 teaspoon vanilla
1-1/2 cups sugar
1.2 teaspoon salt
3 cups all-purpose flour
1 tablespoon baking powder
2 Bartlett pears, peeled, stemmed and diced
1/2 cup sliced almonds
2 cups crumb topping (recipe follows)
Pre-heat a 12-inch Dutch oven with 9 coals underneath and 18 coals on the lid. Combine milk, eggs, sugar and vanilla in a large bowl. Sift flour, salt and baking powder in a bowl. Add dry ingredients to liquid ingredients and mix thoroughly. Dough will be stiff. Fold in pears and almonds.
Lightly oil Dutch oven. Spread dough in Dutch oven. Sprinkle crumb topping evenly over cake dough. Bake at 375 degrees for 50 minutes or until a toothpick inserted in the center comes out clean. Cool; cut into 12 to 18 servings.
CRUMB TOPPING
1-1/2 cups all-purpose flour
3/4 cup packed brown sugar
1/2 cup sugar
1/4 teaspoon salt
1 teaspoon cinnamon
1-1/2 cups old fashion rolled oats
1/2 cup softened butter, cut into pieces
Combine flour, sugars, salt, cinnamon and oats in a medium bowl. Rub in the butter with your finger tips until it’s well blended and the mixture crumbles coarsely. Refrigerate until needed. Makes about 1 quart.
Thursday, October 16, 2014
Pork tenderloin and apples with cider glaze

Last year I started reducing fresh unfiltered apple cider until it had a syrupy consistency. I've added it to homemade hotcake syrup, roasted Brussels sprouts, apple mahogany sauce and apple glaze. I typically purchase the cider in half-gallon bottles and reduce it over high heat to one-quarter its beginning volume (see recipe below). Apple cider is at its peak in the fall.
PORK TENDERLOIN AND APPLES WITH CIDER GLAZE
The recipe for apple mahogany sauce lists several ideas for a sauce such as this one. You can substitute pork chops or chicken breasts for the tenderloin. Saute the meat in a cast iron skillet or grill over hot coals as desired. Brush sauce on the meat during the couple minutes of cooking.
2-1/2 pounds pork tenderloin
Kosher salt and ground black pepper, to taste
2 tablespoons chopped fresh rosemary
2 tablespoons chopped fresh thyme
1 tablespoon unsalted butter
1-1/2 cups apple cider reduction (click for recipe)
2 medium Granny Smith apples, peeled, cored and sliced, 3/4-inch thick
1 tablespoon cider vinegar
2 teaspoons Dijon mustard
Rinse pork and pat dry. Season with salt and pepper. Coat all sides with thyme and rosemary. Melt butter in a 12-inch Dutch oven over medium-high heat. Add pork and cook until browned on all sides.
Place lid on oven and arrange 10 charcoal briquettes under and 19 on lid (heat for 400 degrees F.). Cook 20 to 25 minutes until pork reaches 145 degrees on an instant-read thermometer. Note size and shape will influence cooking time. Place pork on a platter and rest 10 minutes. Pour off any moisture (and reserve for future application, if desired).
Combine cider reduction, vinegar and mustard. Add apples and cider mixture to Dutch oven. Cook over medium heat until apples are al dente and sauce has thickened to glaze consistency. If needed, thin glaze with a small amount (1 tablespoon or less) to apple cider or reserved moisture. Meanwhile, slice pork 1/2-inch thick. Spoon sauce over pork and place apples on either side. If desired, sliced pork can be served from Dutch oven (as pictured).
Makes 6 to 8 servings. Serve with roasted Brussels sprouts and rice pilaf.
Wednesday, October 08, 2014
Baking artisan bread in camp
In the nearly two years since I first talked about artisan no-knead bread, I have baked this bread numerous times, based on my standard recipe. I currently have a batch of dough in the refrigerator at home. While camping at Upper Blue Lake last month, I was able to record notes on my baking process in camp.
These instructions are for use in temperate weather. You need to gauge weather conditions and determine how ambient temperature, humidity and wind conditions will influence internal baking temperature and cooking time. Flexibility is the key. As a rule, coals burn hotter in lower humidity and windier conditions. Cooler, wet weather reduces the heating potential of the coals.
For any Dutch oven recipe on 'Round the Chuckbox, the number of coals are calculated for average summer conditions in the Western United States. You need to experiment and learn how to adapt my instructions to seasonal weather conditions where you live and camp. Use my instructions as a starting point. Experiment at home before taking the the bread into camp to bake.
 |
| Light campfire. While hardwood is the ideal choice of wood, I usually cook with pine, cedar and fir in the Sierra Nevada. As a rule, I build a fire that's two to three times the size in volume than the Dutch oven. The fire must produce sufficient coals to heat the Dutch oven for one hour. I continue to add wood to the fire once I remove the first coals to have a ready source of fresh coals. |
 |
| When you desire to bake a loaf of bread, dust surface of chilled dough with flour. Pull a 16- to 24-ounce piece dough out and cut with a knife or kitchen sears. Gently stretch dough by pulling it down to the bottom, turning the dough one-quarter turn each fold. If desired, slash load before setting it in the Dutch oven, as I did here. This dough was made with 20 percent whole wheat flour. |
 |
| Gentle place the loaf inside a 12-inch deep-style camp oven. Slash the loaf if not done earlier. Place the lid on the oven. Set in shade on a warm day. On a cool day, set in a sunny location. Proof in oven for 40 minutes. |
 |
| Coals are almost ready. You won't see much noticeable rise during proofing. After the 40-minute fermentation period, the load will be ready for baking. Remove the lid, splash about 1 tablespoon cold water over the loaf and replace the lid. |
 |
| Hang the Dutch oven about 18 inches above the bed of coals. Shovel a solid bed of coals on the lid. Bake 15 minutes, then lift the lid and quickly check bread. If it's browning properly, remove the coals from the center of the lid. I've found that this is necessary to ensure the loaf bakes without burning. You need coals for 450 degrees (10 under oven and 23 on lid) when using charcoal briquettes. |
 |
| Continue baking for an additional 30 to 40 minutes. You're looking for a nicely browned crust and firm to the touch Remove coals and cool. |
Wednesday, September 24, 2014
New masthead image
For the first time in nearly 10 years, 'Round the Chuckbox has a masthead image. The photograph was taken in Eldorado National Forest during one of my many campfires up Iron Mountain Road in January 2009.
 |
| I originally developed this image last year to use as a business card. As shot, the Dutch oven was on the left side. I cannot remember the reason that I flipped the image, although I'm certain it was for some obscure artistic reason. |
 |
| Here's a peak Inside the Dutch oven. My cooking journal didn't reveal any details about this pizza. It looks like a take-and-bake pizza from a local shop. |
Thursday, September 18, 2014
Throwback Thursday: Spinach and mushroom lasagna roll-ups
This recipe for rolled single serving lasagna was originally posted in May 2005. Interestingly, I haven't prepared the dish since. My plan was to prepare it at a Dutch oven cookoff, but plans changed.
SPINACH AND MUSHROOM LASAGNA ROLL-UPS WITH MARINARA SAUCE
16 cremini caps, cleaned and finely chopped
1 small onion, finely chopped
2 cloves garlic, minced
2 tablespoons extra-virgin olive oil
1 (10-ounce) package frozen chopped spinach, defrosted and squeezed dry
Salt and pepper
1/4 teaspoon ground nutmeg
2 cups part skim ricotta
8 curly edge lasagna noodles, cooked to al dente (12 to 14 minutes)
2 cups prepared marinara sauce
8 slices mozzarella cheese
In a 10-inch Dutch oven over moderate heat, saute mushrooms, chopped onions, and garlic in oil until mushrooms give off their juices and darken and onions are tender, about 7 or 8 minutes. Season with salt and pepper; the salt will help draw water out of the vegetables as they cook.
Add dry chopped spinach to the pan and heat through for 1 minute. Adjust seasonings with salt, pepper, and a little nutmeg. Add ricotta and stir into mixture to heat cheese through, 1 minute longer. Remove pan from heat but leave in the warm skillet. Place lid on Dutch oven and place about 5 hot coals on lid to keep warm.
Heat marinara sauce in a small pan over moderate heat. Place cooked lasagna noodles on a large work surface or cutting board. Spread lasagna noodles with a layer of spinach-mushroom filling. Leave the last inch of surface free of filling. Roll up pasta and arrange the 8 bundles in a 12-inch Dutch oven. Pour warm sauce over roll-ups and top with mozzarella.
Place lid on Dutch oven and bake at 350-degrees (17 coals on lid and 8 under oven) for 15 minutes or until heated through. At the last minute place about 10 extra coals on lid. Watch closely and remove from heat when cheese starts to brown.
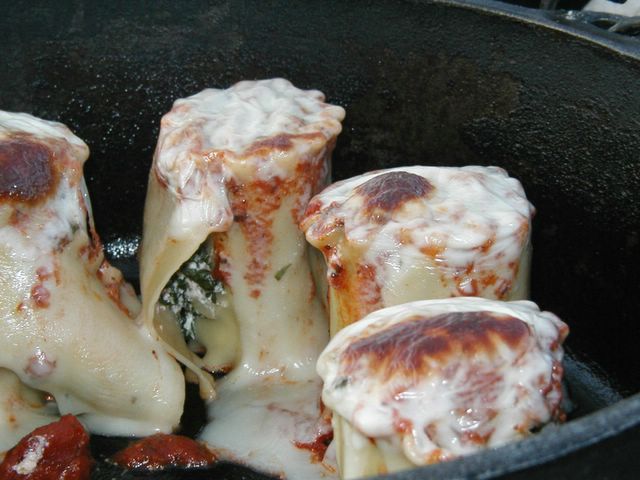 |
| I learned that it's best to leave the last inch or so of lasagna noodle free of filling. The starch in the pasta will bond so the roll-ups don't fall apart as two did for me during the test run. I'll lay them on their side next time I bake the lasagna roll-ups in the Dutch oven. |
16 cremini caps, cleaned and finely chopped
1 small onion, finely chopped
2 cloves garlic, minced
2 tablespoons extra-virgin olive oil
1 (10-ounce) package frozen chopped spinach, defrosted and squeezed dry
Salt and pepper
1/4 teaspoon ground nutmeg
2 cups part skim ricotta
8 curly edge lasagna noodles, cooked to al dente (12 to 14 minutes)
2 cups prepared marinara sauce
8 slices mozzarella cheese
In a 10-inch Dutch oven over moderate heat, saute mushrooms, chopped onions, and garlic in oil until mushrooms give off their juices and darken and onions are tender, about 7 or 8 minutes. Season with salt and pepper; the salt will help draw water out of the vegetables as they cook.
Add dry chopped spinach to the pan and heat through for 1 minute. Adjust seasonings with salt, pepper, and a little nutmeg. Add ricotta and stir into mixture to heat cheese through, 1 minute longer. Remove pan from heat but leave in the warm skillet. Place lid on Dutch oven and place about 5 hot coals on lid to keep warm.
Heat marinara sauce in a small pan over moderate heat. Place cooked lasagna noodles on a large work surface or cutting board. Spread lasagna noodles with a layer of spinach-mushroom filling. Leave the last inch of surface free of filling. Roll up pasta and arrange the 8 bundles in a 12-inch Dutch oven. Pour warm sauce over roll-ups and top with mozzarella.
Place lid on Dutch oven and bake at 350-degrees (17 coals on lid and 8 under oven) for 15 minutes or until heated through. At the last minute place about 10 extra coals on lid. Watch closely and remove from heat when cheese starts to brown.
Thursday, September 11, 2014
Throwback Thursday: Three-sided chicken, use your next campfire to roast a chicken in a Dutch oven
I wrote this article while camping in Oregon's Diamond Lake 10 years ago. It ran in the fall 2004 issue of the IDOS Dutch Oven News. It was written from the perspective of fall camping. With fall quickly approaching, why not give it a try?
Do you remember the last time you stood around a glowing fall campfire? Your backside froze in the crisp autumn air while your front roasted. To equalize the radiant energy of the campfire, you’d momentarily turn your back to the fire. But soon, your front would freeze and you’d once again turn to face the fire.
The autumn campfire gives fall campers the perfect opportunity to cook a favorite among camp dishes. So, why waist a good campfire? Prepare three-sided chicken for dinner with your next fall campfire. Like the two-sided effect of the campfire, a whole chicken fryer roasts on three sides (top, bottom and the side facing the fire) in a deep-model Dutch oven.
Three-sided cooking in camp
 Next time you light a campfire on a fall camping adventure, clear a spot in front of the fire for a large Dutch oven. Meanwhile, slip a jacket on to keep your back warm, step over to the chuckbox and rub a fresh four to five pound chicken fryer your favorite seasoning. Once the campfire burns to a nice bed of coals, you’re ready to cook.
You’ll need a large campfire to produce sufficient coals to boost the oven to an estimated internal temperature of 375 degrees to 400 degrees F. The hot oven turns the skin to a crisp golden brown and the breast meat to a succulent juiciness when cooked just right. To evenly brown the bird, apply heat to three sides of the oven. Top, bottom and backside heat creates a bird with perfectly browned skin.
To start, burn a large campfire until a hot, glowing bed of coals remains. This’ll take 30 to 60 minutes, depending on the available wood. Then clear a shallow pit in front of the fire that’s the approximate diameter of a 12-inch Dutch oven. When ready, use a shovel to transfer hot coals to the pit and pre-heat the Dutch oven over the bed of coals.
Since you don’t want to set the chicken onto the floor of the oven, place a round baking rack or Dutch oven trivet in the oven. (Don’t have a trivet? Set the chicken on a bed of roughly chopped onion, carrot and celery.)
Place the seasoned chicken on the rack or trivet. Then place the lid on the oven and shovel a heap of coals over the Dutch oven. It’s this blast of heat that’ll radiate to the skin and transform the chicken into a delicious meal.
The problem with three-sided cooking is that the fourth side languishes without intense heat. It sets at sub-roasting temperatures while the side that faces the fire sizzles dangerously close to carbonization. To ensure even cooking, frequently turn the Dutch oven. At the same time, rotate the lid in the opposite direction. This’ll compensate for the uneven cooking of the coals.
If you haven’t done so already, add fresh firewood to the fire. Heat from the flame and the coals of the fire will radiate to the exposed side of the oven. Next time that you lift the lid, you’ll notice the skin and juices sizzling toward a simple meal.
Senses become your doneness meter
I can’t tell you how long you’ll be able to face the fire before you must turn your body. Each person comes to the campfire with his own tolerances for heat and cold. This is where you’ll have to depend on experience––both as a camper and cook.
Nor can I tell you how many coals that you’ll need to heat the oven to 375 degrees F. Just pile fresh coals on the lid of the oven as often as needed to maintain oven temperature. Experience will teach you how many coals to add to the pot.
Your senses will become your thermometer and doneness indicator. You’ll have to gauge temperature by watching the chicken cook. (Is the skin sizzling or sitting limp? Has the skin started to brown within 20 to 30 minutes?) Since you don’t want to lift the lid too often, listen for cooking sounds (can you hear the sizzle?). And as the chicken cooks, satisfying aromas will waft up to you.
All three--browning action, sizzle and aroma--work together to help you assess the bird’s progress and ultimate doneness. To gauge doneness, simply pull one leg from the body. If it gives with an effortless twist and the juices run clear, the chicken is done. It’ll take 1-1/4 to 1-1/2 hours to roast the chicken.
The key is to cook the chicken just until it’s done––not a minute longer. Overcook the bird and you’ll be rewarded with dry meat. You’ll need a quart of gravy to make the meal palatable. And remember, if it smells burnt, it is.
For a complete meal, add Yukon Gold or Klondike Rose potatoes to the pot about 45 minutes before the chicken is done. One or two small potatoes per person should do. Or cool the chicken slightly and pull the meat off of the bone. Then wrap in flour tortillas with Spanish rice, salsa and sour cream.
Plan to cook three-sided chicken on your next fall camping adventure. Follow these simple techniques and you’ll be rewarding with one of the simplest Dutch oven meals that you can produce in camp. You’ll need a jacket to warm your back and a campfire to heat your front and roast the chicken.
The softwood solution
I depend on downed softwood in the Sierra Nevada high country to build my campfires. To me, it’s a waste of precious dollars to haul oak firewood or charcoal briquettes to the campground. I instead rely of the natural resources of the forest.
I’ve learned that to be successful with softwood you must pay constant attention to your Dutch oven. Pine, fir and cedar burns quickly. As a result, you need watch your oven and replenish the coals often.
I don’t focus oven temperature when camping. I just pile hot coals from the campfire onto the oven with a gloved hand and a pair of 14-inch tongs. I use experience and the five senses to approximate the correct number of coals.
I usually build a campfire that’s four to five times the volume of the camp oven and burn it down to a glowing bed of coals. You can accomplish this in approximately 30 minutes with pine, fir and cedar.
I've learned from many poorly cooked dishes that you can never have too many campfire coals. To make sure I finish the dish with sufficient heat, I continue to feed the campfire even after I’ve heated the oven. I keep feeding the fire as long as I have a plentiful supply of firewood.
TIPS FOR A PERFECTLY ROASTED CHICKEN
Do you remember the last time you stood around a glowing fall campfire? Your backside froze in the crisp autumn air while your front roasted. To equalize the radiant energy of the campfire, you’d momentarily turn your back to the fire. But soon, your front would freeze and you’d once again turn to face the fire.
The autumn campfire gives fall campers the perfect opportunity to cook a favorite among camp dishes. So, why waist a good campfire? Prepare three-sided chicken for dinner with your next fall campfire. Like the two-sided effect of the campfire, a whole chicken fryer roasts on three sides (top, bottom and the side facing the fire) in a deep-model Dutch oven.
Three-sided cooking in camp
You’ll need a large campfire to produce sufficient coals to boost the oven to an estimated internal temperature of 375 degrees to 400 degrees F. The hot oven turns the skin to a crisp golden brown and the breast meat to a succulent juiciness when cooked just right. To evenly brown the bird, apply heat to three sides of the oven. Top, bottom and backside heat creates a bird with perfectly browned skin.
To start, burn a large campfire until a hot, glowing bed of coals remains. This’ll take 30 to 60 minutes, depending on the available wood. Then clear a shallow pit in front of the fire that’s the approximate diameter of a 12-inch Dutch oven. When ready, use a shovel to transfer hot coals to the pit and pre-heat the Dutch oven over the bed of coals.
Since you don’t want to set the chicken onto the floor of the oven, place a round baking rack or Dutch oven trivet in the oven. (Don’t have a trivet? Set the chicken on a bed of roughly chopped onion, carrot and celery.)
Place the seasoned chicken on the rack or trivet. Then place the lid on the oven and shovel a heap of coals over the Dutch oven. It’s this blast of heat that’ll radiate to the skin and transform the chicken into a delicious meal.
The problem with three-sided cooking is that the fourth side languishes without intense heat. It sets at sub-roasting temperatures while the side that faces the fire sizzles dangerously close to carbonization. To ensure even cooking, frequently turn the Dutch oven. At the same time, rotate the lid in the opposite direction. This’ll compensate for the uneven cooking of the coals.
If you haven’t done so already, add fresh firewood to the fire. Heat from the flame and the coals of the fire will radiate to the exposed side of the oven. Next time that you lift the lid, you’ll notice the skin and juices sizzling toward a simple meal.
Senses become your doneness meter
I can’t tell you how long you’ll be able to face the fire before you must turn your body. Each person comes to the campfire with his own tolerances for heat and cold. This is where you’ll have to depend on experience––both as a camper and cook.
Nor can I tell you how many coals that you’ll need to heat the oven to 375 degrees F. Just pile fresh coals on the lid of the oven as often as needed to maintain oven temperature. Experience will teach you how many coals to add to the pot.
Your senses will become your thermometer and doneness indicator. You’ll have to gauge temperature by watching the chicken cook. (Is the skin sizzling or sitting limp? Has the skin started to brown within 20 to 30 minutes?) Since you don’t want to lift the lid too often, listen for cooking sounds (can you hear the sizzle?). And as the chicken cooks, satisfying aromas will waft up to you.
All three--browning action, sizzle and aroma--work together to help you assess the bird’s progress and ultimate doneness. To gauge doneness, simply pull one leg from the body. If it gives with an effortless twist and the juices run clear, the chicken is done. It’ll take 1-1/4 to 1-1/2 hours to roast the chicken.
The key is to cook the chicken just until it’s done––not a minute longer. Overcook the bird and you’ll be rewarded with dry meat. You’ll need a quart of gravy to make the meal palatable. And remember, if it smells burnt, it is.
For a complete meal, add Yukon Gold or Klondike Rose potatoes to the pot about 45 minutes before the chicken is done. One or two small potatoes per person should do. Or cool the chicken slightly and pull the meat off of the bone. Then wrap in flour tortillas with Spanish rice, salsa and sour cream.
Plan to cook three-sided chicken on your next fall camping adventure. Follow these simple techniques and you’ll be rewarding with one of the simplest Dutch oven meals that you can produce in camp. You’ll need a jacket to warm your back and a campfire to heat your front and roast the chicken.
The softwood solution
I depend on downed softwood in the Sierra Nevada high country to build my campfires. To me, it’s a waste of precious dollars to haul oak firewood or charcoal briquettes to the campground. I instead rely of the natural resources of the forest.
I’ve learned that to be successful with softwood you must pay constant attention to your Dutch oven. Pine, fir and cedar burns quickly. As a result, you need watch your oven and replenish the coals often.
I don’t focus oven temperature when camping. I just pile hot coals from the campfire onto the oven with a gloved hand and a pair of 14-inch tongs. I use experience and the five senses to approximate the correct number of coals.
I usually build a campfire that’s four to five times the volume of the camp oven and burn it down to a glowing bed of coals. You can accomplish this in approximately 30 minutes with pine, fir and cedar.
I've learned from many poorly cooked dishes that you can never have too many campfire coals. To make sure I finish the dish with sufficient heat, I continue to feed the campfire even after I’ve heated the oven. I keep feeding the fire as long as I have a plentiful supply of firewood.
TIPS FOR A PERFECTLY ROASTED CHICKEN
- Don’t truss the chicken. Though recommended by chefs, trussing forces the breast up into the oven’s head space. This reduces the likelihood that the chicken will brown properly.
- Rotate the Dutch oven often. For a perfectly browned chicken, rotate the oven in increments. You have to judge how often based on experience and observation. As the skin in the first section browns, give the oven a 45- to 90-degree turn to brown the next section.
- Think food safety. A bout of Salmonella is the last thing you want in camp. Freeze the bird at home. Then wrap it in two sheets of newsprint and enclose it in a large zipper-lock bag. And thoroughly scrub your hands in warm soapy water after handling the chicken.
Monday, September 08, 2014
Shallow vs. deep camp oven
 |
| Chef Steven with three shallow and two deep camp ovens at Leonard "Wagon Cook" Sanders' 50th birthday celebration in Oroville, California, December 2002. |
The question being asked here is whether you will use a regular or shallow Dutch oven or a deep model? The popular manufacturers cast Dutch ovens in both sizes. Lodge Manufacturing, for instance, produces a line regular and deep camp ovens in 10-, 12- and 14-inch diameter pots.
The Lodge deep 10-inch camp oven holds one additional quart of volume and is five-eighths-inch deeper than the shallower model. The Lodge deep 12- and 14-inch camp ovens each hold an extra two quarts and are one and one-quarter inch deeper. The deeper ovens feature a narrower base.
Camp Chef also manufactures a line of deep camp ovens in 10- and 12-inch diameters. Their camp ovens are made to similar specifications used by Lodge. Lodge uses the term “camp oven” to differentiate ovens made for outdoor cooking from home-style Dutch ovens.
The added height and capacity of the deeper camp ovens provides extra headroom. This lets the outdoor cook prepare fit larger roasts and poultry into the Dutch oven without being cut into smaller pieces. Deep ovens are also useful for bread baking, stewing and frying.
When considering the type of Dutch oven to use, look at the pan or pot you’d use for a recipe inside the home kitchen. You want to select the Dutch oven that best fits that profile. For instance, a layered dish, like lasagna, works best inside the wide, flat confines of a regular oven while a rib roast can only fit in a deeper oven.
The regular or shallow camp oven is best used for any recipe that benefits from the shallow pan with a wide base. Use for rolls, biscuits, cookies and cakes; casseroles, lasagna and other layered dishes; small cuts of meat, fish and poultry; etc. The wide base also makes a better skillet than the narrow base of the deep camp oven.
Cakes are best baked in a regular Dutch oven. The shallow oven and wide base more closely mimics the shape and size of a standard round aluminum cake pan. This allows for even baking while maintaining moderate depth in the cake.
As explained above, the deep camp oven is best when you need extra depth for large cuts of meat and poultry, loaves of bread, or any dish where you want the extra headroom. The also make good bean pots. The narrow base lets you concentrate heat and moisture around pieces of meat and vegetables, thus minimizing the likelihood of the dish drying out. Use the deep oven for stews and soups as well.
For meat and poultry, the size of the piece determines the oven to use. A whole chicken, for instance, requires a deep oven because of its size and structure while several smaller Cornish hens should neatly fit inside a regular oven. Cut-up chicken (individual pieces or quarters) works best in a regular oven where the wide base and shallow headroom allow for even heat distribution and cooking.
Next time you want to cook in a Dutch oven, consider whether a shallow or deep oven is best for the dish. While it's possible to interchange these ovens (as I have done many times), consider the advantages of each oven. The deep camp oven is best reserved for dishes that neatly fit inside its deep profile. The same hold true for the shallow oven.
Thursday, September 04, 2014
Throwback Thursday: My first recipe on the blog
Beginning today, I intend to re-post articles from the early days of 'Round the Chuckbox each Thursday. My goal is to give new life into some of my early articles. I will fix broken links and take care of spelling and bad grammar. Otherwise, I'll leave the article as originally written.
The recipe for chuckwagon chili was first posted on February 5, 2005. It was my first recipe and second article to the blog.
My daughter, son-in-law and granddaughter are over for the weekend. Since it’s their first trip up from the Bay Area since the wedding, we’re having a few friends over this afternoon. I though a simple chili, cooked in one of my 14-inch Dutch ovens over the camp stove would hit the spot.
Traditional red chili is defined by the International Chili Society as any kind of meat or combination of meats, cooked with red chili peppers, various spices and other ingredients, with the exception of beans and pasta, which are strictly forbidden. Traditions aside, beans have a nice way of rounding a hot bowl of red. Besides, the cowboys ate beans by the bowl. Add 4 (14-ounce) cans of pinto or red beans at the second spice dump.
If you're so inclined, use a mixture of beef base diluted with beer instead of water. Make sure that you use Grandma's or Gephardt's chili powder, not a generic brand.
CHUCKWAGON CHILI
6 pounds round steak, coarsely ground
1/2 cup olive oil
3 ounces chili powder
6 tablespoons ground cumin
6 clove garlic, minced
2 medium red onion -- chopped
6 dried ancho peppers, remove stems and seeds and boil 30 min in water
1 tablespoon dried oregano
2 tablespoons paprika
2 tablespoons red wine vinegar
3 cups beef broth
1 (4-ounce) diced green chiles
12 ounces crushed tomatoes
Hot pepper sauce, to taste
Brown meat in olive oil in a 6-quart Dutch oven over medium heat. Drain excess fat; add chili powder, cumin, garlic and chopped onions. Simmer over low heat 30-45 minutes using as little liquid as possible. Add beef stock only as necessary. Stir often.
Remove skins from boiled pods, mash pulp and add to meat mixture. Add oregano, paprika, vinegar, 2 cups beef broth, chiles, stewed tomatoes and hot pepper sauce. Simmer 30-45 minutes. Stir often. Adjust seasoning. Serve with fresh bread. Makes about 1 gallon or 12 (1-1/3 cup) servings.
Traditional chili garnishes -- diced onions, grated sharp cheddar cheese and chopped cilantro -- compliment this dish well.
This recipe is adapted from the October 2004 issue of Food Management. Chef Joe Eidem of the Washoe (Reno, Nevada) Health System serves his chuckwagon chili in the hospital’s cafeteria.
Wednesday, September 03, 2014
1,500 posts on 'Round the Chuckbox

While I enjoy the long hours and seemingly chaotic atmosphere of the commercial kitchen, laboring in the outdoor camp kitchen has been my true love for decades. I share a common interest in outdoor cooking with the readers of 'Round the Chuckbox. Together we enjoy cooking in cast iron Dutch ovens, grilling over a campfire and smoking in the barbecue.
When I look back at the articles I posted while away from home this summer, those that relate to outdoor cooking were the best performers. Of the 36 pieces between late-April and mid-August, two standout. This means they performed significantly better than the thirty or so articles on cooking in the camp kitchen.
It seems readership declines whenever I shift focus from outdoor cooking to my work as a camp chef. The statistics show more readers would rather read my thoughts on locating the massive Lodge 20-inch skillet last April than to view a picture of my baked apple pancake. These two were the best and worst performing posts of the spring and summer.
The second highest performing blog of the season was a series of images of a Dutch oven cookout last May. And the two Dutch oven recipes that I've posted since returning home (baked orange French toast and layered cabbage and potatoes with bacon) are above the others.
Not everyone goes away when I place emphasis on cooking for large numbers of campers. 'Round the Chuckbox draws readers from those interested in cooking for groups as well as outdoor cooks. But the pool of those interested in outdoor cooking seems to be somewhat larger than the group of quantity cooking enthusiasts.
I plan to continue posting articles on cooking for groups and outdoor cooking. As I see it, both types of cooking fit within my calling as a camp cook. Since many folks enjoy reading Dutch oven articles, the focus for the fall and winter will be towards outdoor cooking. While I may post one or two more articles from Oakland Camp this summer, I'm ready to put the modest cast iron collection to work.
=====<<>>=====
Click here to see what I had to say when I posted my 1,000th blog article. "As long as I'm able to cook and write," I said on February 5, 2010, "I trust that you'll continue to find the blog interesting. Please drop a note. I always enjoy hearing from my viewers."
Saturday, August 30, 2014
Chuckwagon videos
Here's a YouTube videos series on the history of the chuckwagon. It also includes the basics of Dutch oven cooking at the wagon. The gentleman is well-spoken. He gives interesting detail on Nineteenth Century cattle drives and the chuckwagon, cook and Dutch oven. I believe the videos were filmed at the Oak Grove Cowboy Weekend in Michigan.
Wednesday, August 27, 2014
Baked orange French toast
 The Stanley Ranch Cook Book is one my favorite sources for inspiration and recipes. It’s hosted by the Stanley Ranch in Fossil, Oregon. Many recipes seem to the contribution of the unnamed ranch cook. (Edit: The cookbook is no longer available on-line).
The recipe for baked orange French toast caught my eye while pursuing side dishes last week. This recipe is the contribution of by Marlene Stanley, who owns the ranch with husband her Rick. Once I prepared my rendition for camp in a Dutch oven, I discovered the subtle orange flavor throughout. It doesn't overwhelm. Instead, the orange juice and zest give the breakfast dish wonderful balance between traditional French toast and the orange flavor.
BAKED ORANGE FRENCH TOAST
Eliminate the pecans to make the recipe nut free. Marlene Stanley’s version called for 2/3-cup orange juice and 1/3-cup orange liqueur. Since I generally don’t purchase liqueurs, I used a full cup of juice. I’m certain the liqueur will give the French toast an even richer flavor.
12 ounces day old French bread, cut into 1-inch cubes
1 cup toasted pecan pieces (see recipe below)
6 large eggs
1 cup half and half
1 cup orange juice
1 tablespoon orange zest
3 tablespoons granulated sugar
1/4 cup melted butter
Place bread cubes in a lightly greased 9- or 10-inch round cake pan. Spread pecans evenly over bread. Whisk eggs, half and half, orange juice, orange zest and sugar together in a medium bowl. Pour batter evenly over the bread. Push bread down into the batter.
Cover and place in refrigerator or ice cooler. Refrigerate at least four hours or overnight if being served for breakfast. In the morning, take the pan out of the refrigerator or ice cooler. Light 28 charcoal briquettes. Meanwhile, pour melted butter evenly over bread.
When coals are barely covered with ash, pre-heat a 12-inch Dutch oven with 8 coals underneath and 20 on the lid. (Alternatively, pre-heat the oven to 350 degrees F.; bake in oven as directed.) Remove lid and place the pan inside the Dutch oven. Replace the lid and bake 40 minutes, until French toast is set and puffed up.
Remove pan from Dutch oven. Cool 10 minutes. Cut into 8 wedges. Offer 1 or 2 wedges to each person. Serve with syrup. Marlene Stanley recommends serving a sauce of melted butter and marmalade on the side.
TOASTED PECANS
Toasting brings out the wonderfully nutty flavor of the pecan. Remove from the heat as soon as you smell wonderfully nutty aroma of the nuts. Stop the cooking by placing the nuts in a small bowl.
1 cup chopped pecans (approximately 2-1/4 ounces)
1 tablespoon unsalted butter
Melt butter in a small heavy skillet over medium heat. Add pecans and toss to coat with butter. Toast, stirring frequently, until lightly toasted, about 5 to 8 minutes. Do not brown. Remove from heat and use as directed.
Subscribe to:
Comments (Atom)
