Showing posts with label leftovers. Show all posts

Monday, March 10, 2014

Re-purposing leftovers at camp

The cooks must find creative ways to re-purpose leftovers at Oakland Feather River Camp. Serving reheated leftovers in their original form is frowned on by camp management. With few exceptions, campers expect freshly prepared meals.

As the chef, I understand the restrictions. Campers pay over $90 per night to camp under the towering Ponderosa pines. They expect three newly prepared meals in the Chow Palace each day. It's not fair to serve to recycle meals.

While I try to plan meals as closely as possible to demand, there are times that campers don't eat what we expect then to. As a result, we're left with numerous pans of leftovers in the walk-in. So, I'm driven to find ways to work within the spirit of the policy. For obvious reasons, I cannot discard leftovers. It's cost prohibitive and poor management of limited resources.

Re-purposing leftovers is an important tool. Most of our solutions last summer were simple. We didn't have time to completely convert each leftover dish into something new. Where possible, our normal solution was to use the item as a basic ingredient in another dish.

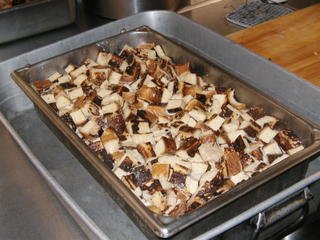
I've saved leftover French toast to use in bread pudding for years. The custard-infused toast enhances the sweet dessert. It adds another layer of cinnamon-nutmeg goodness. Last May, in the wake of our first weekend camp, I learned that these campers weren't big on bread. Faced with some 150 leftover dinner rolls, I saved them in the freezer a later bread pudding.

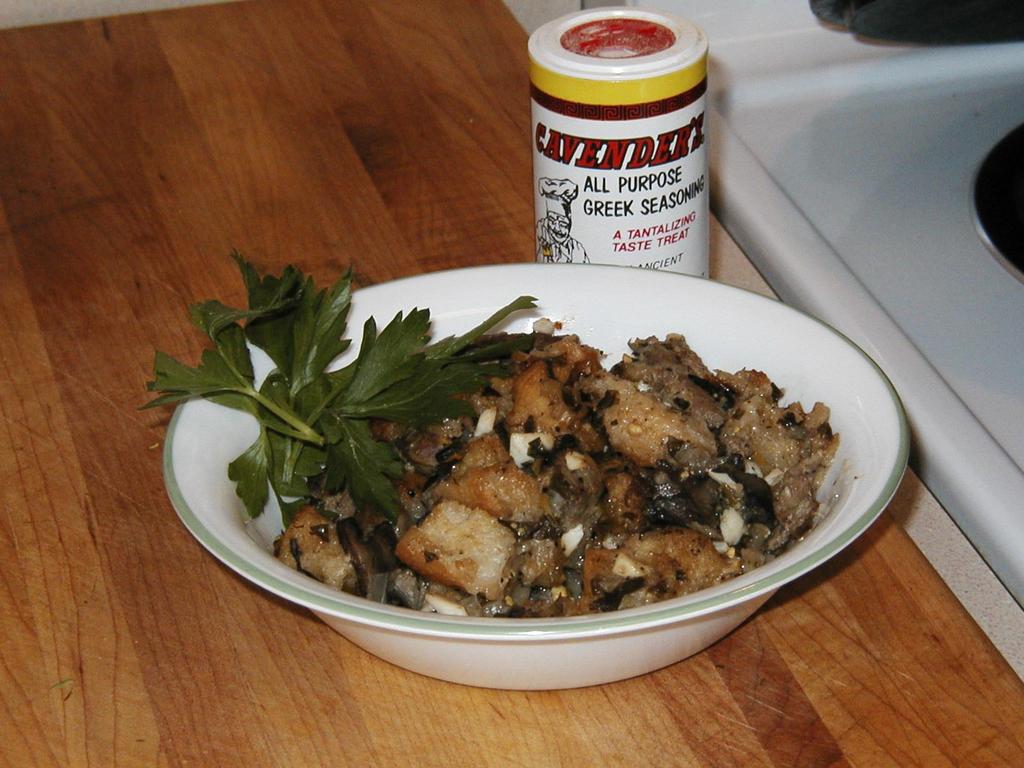
The cooks routinely left the sauce off of one-third of the Friday night barbequed chicken. The meat was pulled from the bone and refrigerated. It was then used for chicken salad for the salad bar, chicken chili (as an alternative to beef or pork chili) or breakfast burritos.

Likewise, the meat was often pulled from the leftover pork spareribs. Sauced meat was repurposed as pulled pork. The smokey notes of un-sauced meat made for great chili verde.

Options to use leftover vegetables abound as well. Many work well in salads. Leftover whole kernel corn was used to prepare corn and tomato salsa. Add fresh diced tomatoes, minced chili peppers, garlic and chopped cilantro. We served the salsa with the appropriate meal.

Yes, there are times that I allowed the cooks to serve reheated leftovers alongside the planned meal. Our largest camp -- a private group of more than 300 campers -- expects leftovers. In that instance, they become a blessing by relieving the pressure placed on the regular menu by the large group.

We also served leftovers for dinner on Independence Day last summer. After stuffing themselves at a midday barbecue, most campers enjoyed the leftovers, which were served alongside limited portions of the regular dinner meal. The camp director was happy, as were the campers. It gave them a chance to eat as much or as little as they desired.

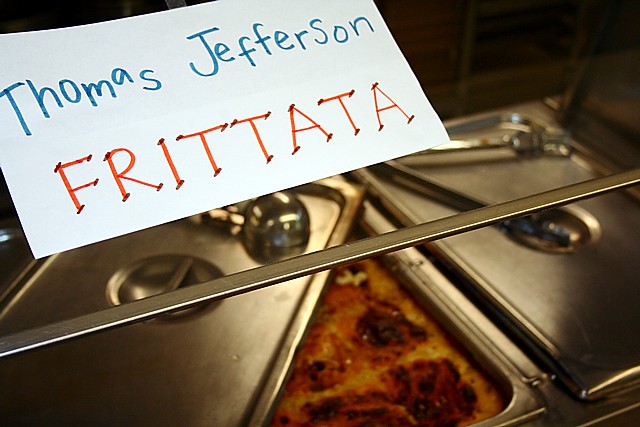
Not all of my attempts to repurpose leftovers have enjoyed complete successful. One time I renamed leftover macaroni and cheese and served it for breakfast to a limited reception. I named it "Thomas Jefferson Frittata" as a tribute to his role in bringing pasta to America. By the end of the meal the campers only ate one of the two leftover pans.

Most ideas that I've presented are basic. I'd love to hear your ideas for using leftovers in the camp kitchen. If I acquire enough ideas, I'll present them in a future blog post.

My personal breakfast this morning consisted of leftover sautéed cabbage and carrots, roasted broccolini and grilled Polish sausage.

STOCKING THE STAFF REFRIGERATOR

Last summer, the cooks stocked leftovers in the staff refrigerator, which is located in the break room. They placed eight to 10 portions of the entrée and side dishes into zipper lock bags. As the week progressed, the stock of leftovers progressively grew to unmanageable proportions. I found myself discarding older leftovers two or three times each week.

This practice has it's limitations as most staff eat in the Chow Palace during regular meal periods. It's great for the occasional staff member who misses the meal and those with the midnight munchies. Space limitations are compounded by the fact that the staff refrigerator is the designated place for staff to store small quantities of personal food.

I plan to revisit this process this year. At times I felt the cooks were using the staff refrigerator to avoid stocking leftovers in the walk-in. If managed closely, it can work to the benefit of staff who find the need to miss a meal. Yet, the cooks need to respect staff that store personal food in the refrigerator.

Monday, April 25, 2011

Build your own burrito

The first thing I do at work each Monday morning is to survey the refrigerators for weekend leftovers. As I work through each container, I work up a mental list of uses for the leftovers that I find. Many (especially rice, beans and most vegetables) find their way into soup early in the week.

The cooks did a good job over the weekend. Unlike most Mondays, where six or more containers test my ability to utilize leftovers, I only found a large container of spiral-cut ham and a small bowl of salsa verde.

My initial reaction was to cook scalloped potatoes with ham for dinner. By its self, the residents would've enjoyed the cream dish. I was all set to slice potatoes and prepare a rich bechemel when I walked by the flavored tortilla wraps at Cash and Carry this afternoon.

I quickly changed the menu. A purchased crimini mushrooms, packaged spinach and sweet grape tomatoes for the filing. Three packages of the large flavored tortilla would form the burrito wrapper.

Back in the kitchen, it took about 90 minutes to do my prep and to cook individual components for the burrito. I added brown rice pilaf and re-fried beans (from a package of Sysco dehydrated re-fried beans) to the menu for additional filler.

Once the residents started asking what was for dinner, I thought that a build your own burrito would be the best approach, as residents were trying to special order their burrito. I set up a burrito station with each ingredient at arm's reach. I built and folded one burrito for each resident to her liking.

Components for the burrito fest included:
  • 30 (13-1/2-inch tortilla wraps (10-each tomato, spinach and whole wheat)
  • 4-1/2 pounds ham, heated in oven
  • 2 (9-ounce) packages spinach, sauteed
  • 2 pounds sliced crimini mushrooms, sauteed
  • 2 pounds sweet grape tomatoes, sauteed
  • 1 pound chopped green onions
  • 2 jalapeno chili peppers, minced
  • 2-1/2 quarts re-fried beans
  • 3 quarts brown rice pilaf
  • 2 pound shredded cheese
  • 2 quarts salsa ranchera
The meal took 25 minutes to serve, almost twice the time that needed to serve 25 residents. But it was worth the extra effort. Each resident received a burrito tailored to her liking.

Sunday, January 16, 2011

Handling leftovers in camp or there’s nothing better that leftover spaghetti

There's nothing better that leftover spaghetti, especially when camping. I don’t know exactly what happens, but the pasta and tomato sauce seems to age with time. It's one of those meals that tastes better the second time around.

Spaghetti also makes a great meal for the first night in camp. It heats up quickly with little fuss. Just fire up the stove, preheat a cast iron skillet and reheat the spaghetti. Toast some garlic bread and toss a salad and dinner is ready. (The recipe for spaghetti that's better leftover follows at the end of the article.)

But before you toss the pasta and sauce in the skillet, you need to understand a few rules about handling leftovers in camp. A few minutes after each meal is all you need to take care of leftover food.

Handling leftovers in camp

Leftover food must be cooled quickly. Professional chefs understand that food must be cooled through the "danger zone" in four hours or less. The danger zone is the temperature range from 41 to 135 degrees. This is the zone in which bacteria and other harmful microorganisms grow rapidly. To prevent rapid bacterial growth, chefs divide leftovers into small portions and place the containers of food over ice. This quickly dissipates the heat in the dish.

It's always best to avoid leftovers in camp. The camp cook often finds it difficult to make sure that leftovers are adequately cooled, especially in hot weather. That's the down side of saving leftovers. But, despite the best efforts of the camp cook, wayward appetites can easily foil the best-laid plans.

Saving leftovers

Few camp cooks like to throw food away. That's guidance I even find hard to follow in camp. So when you're faced with leftovers, use these techniques to save them:
  • Put leftover food away within two hours of being served. The longer food remains within the danger zone, the greater chance you have of contaminating it with harmful bacteria.
  • Place leftovers in plastic containers. Plastic transfers heat more rapidly than glass or metal. I like the Ziploc Brand 20- and 32-ounce containers. They're easy to handle and are the right size holding leftovers in camp.
  • Set the container of food directly on the block of ice to cool. This is especially important in hot weather since your ice chest may be higher than the 41-degree maximum temperature. Once the dish is cooled, you can move it to a more convenient area of the ice chest.
  • Use leftovers within three days. Bacteria growth doesn't stop in the ice chest. It just slows considerably. It's much safer to eat the leftovers within three days. If you can’t, dispose of them.
Reheating leftovers

Leftovers make great lunches. Their also ideal quick meals in camp. So use these techniques to make sure leftover are safely reheated:
  • Wash your hands. A salmonella infection -- or worst yet E. coli -- is the last ailment you want when camping. Hand washing is one of
    your top defenses against food borne illness.
  • Heat leftovers until they're 165 degrees throughout. Add a little water to the pan if the dish is dry. This will moisten the dish and help it heat quickly. Purchase an instant-read or digital thermometer for your camping set-up. It's the only accurate way to test for temperature. Cooper Instruments and Taylor USA both make thermometers for home and camp use.
  • Reheat only what your hungry campers can eat. If you have enough of a particular leftover dish for two meals, divide it in half and only reheat what your campers want. Return the remaining half to the cooler for a later meal.
  • Never save leftovers a second time. Once you’ve reheated a leftover dish, it’s best to dispose any that remains.
  • Keep hot food hot and cold food cold. All chefs recite the mantra of food service in their sleep nightly. Camp cooks and campers get sick when contaminated food is allowed to stay in the danger zone long enough for bacteria to grow.
SPAGHETTI THAT'S BETTER LEFTOVER

Spaghetti is the perfect meal for the first night in camp. Prepare the sauce and pasta at home two days before the trip and cool in the refrigerator. As hungry campers set up the tent, reheat the spaghetti in a skillet. Sprinkle some grated Parmesan cheese and squeeze a lemon wedge or two over the pasta. You'll enjoy mouth-watering tomato sauce and pasta without all the fuss.

1 pound lean ground beef or Italian sausage
1/2 medium chopped onion
2 cloves minced garlic
1 15-ounce can diced tomatoes
1 15-ounce can tomato sauce
1 6-ounce can tomato paste
1 cup water
1 tablespoon dried basil
2 tablespoons chopped fresh parsley
1 teaspoon ground black pepper
1 teaspoon salt
12 ounces of your favorite pasta

Brown beef or sausage in a skillet over medium heat. Break up meat as it cooks. Add onions and garlic and cook until onions are translucent. Drain fat. Add seasoning, tomatoes and water. Bring to a boil. Reduce heat and simmer for about 30 to 45 minutes to blend flavors. Makes about 7 cups of sauce.

In a large stockpot, boil 4 quarts salted water. Add pasta to water and reduce to a simmer. When done (5 to 6 minutes for vermicelli and 9 to 12 minutes for spaghetti), drain in a colander and rinse. If desired, mix sauce and pasta. Otherwise, serve sauce over pasta. Serves 4 to 7.

To chill — Chill leftover spaghetti and sauce within 2 hours. Mix pasta and sauce together. Place in a plastic self-closing bag or plastic container, uncovered. Cover once spaghetti has cooled. Place spaghetti into the refrigerator or ice chest and store at 41 degrees or lower. Use within 3 days.

To reheat — Place skillet over medium heat and preheat. Add leftover spaghetti. Stir often with a spoon, being careful not to scorch. Heat spaghetti until it's steaming and hot throughout (heat to 165-degrees). Serve immediately.

Monday, July 19, 2010

Campfire hash

When papa makes his world-famous campfire hash, he expects those who call him papa to eat it. Maybe next time!

Faced with leftovers in the ice chest, I made a quick hash in a cast iron skillet over the campfire this morning. Leftover cottage fried potatoes, diced chicken and broccoli with three eggs made for a great breakfast.

Hash is quick. And it makes leftovers go away. I recommend planning one hash day for a week-long camping trip.

To prepare, chop or grind equal portions of meat, potatoes and onions. The traditional approach is to run the meat and vegetables through a meat grinder. I prefer to serve a more chunky hash.

Heat a medium-sized cast iron skillet over medium-high to high heat. Add a couple tablespoons of oil (or bacon grease from the morning bacon) to the skillet. Add the hash ingredients to the skillet.

Brown the hash, turning with a spatula after several minutes. Season with kosher salt and ground black pepper. Let the hash cook at least 10 to 15 minutes or until it's crisp and cooked through.

To cook eggs, remove the skillet from the fire. Make a shallow depression for each egg. Hold the skillet level and carefully crack an egg into each depression. Cover with a lid, return skillet to the fire and cook until the eggs are cooked to the desired doneness.

Have plenty of hot sauce on hand. While the grandchildren may not like it, campfire hash is one of those dishes that cries out for hot sauce. Three or four varieties will satisfy the tastes of any large group.

And don't forget the most American of all hash toppings -- tomato catsup. A little catsup will encourage the grandchildren to eat it next time!

Tuesday, April 20, 2010

Leftovers

Monday is turning into a day to re-form leftovers into a new dish at work. I often use them to make soup. Rice, pasta and vegetables are the most common leftovers from the weekend.

Yesterday morning I took a quart of spicy chili beans and pureed the beans with about two cups of scalloped potatoes. To finish the soup, I added a diced tomato to the puree and built the soup up with a quart of chicken stock.

The residents enjoyed a smooth, slightly thick bean soup for lunch. I garnished the spicy soup with finely shredded cheddar cheese.

Several residents added crushed corn chips for extra flavor. "The soup is so good," exclaimed one resident.

My goal when using leftovers is to re-form them into a new dish. Dishes like the soup give a new purpose to the leftovers. I often use leftovers to create something that the residents will enjoy.

By skillfully using leftovers with a bit of forethought, I keep the bottom line under control. It's difficult to forecast the exact amount of food that the residents will eat at any one meal.

The number of residents on self-imposed diets, individual likes and dislikes and residents on passes influence the amount of leftover food. I try to prepare according to the number of residents that will eat a particular menu item.

Fortunately, I'm rarely faced with excessive leftovers. Experience helps me keep it under control.

Sunday, July 19, 2009

Philly-style Polish sausage sandwiches and inter-session meals

My number-one inter-session food request from staff is for adult food. The instructors (and the small number of campers staying for the next session) want off-menu food items. They welcome any dish that's a change from the standard Deer Crossing Camp two-week cycle menu.

When I started lunch prep at 11 a.m. yesterday, I quickly assembled 2 salsas. My first thought was to offer a trio of salsas to the 14 staff and campers that would eat lunch. Three unique flavor combinations would form the basis for a chip and salsa extravaganza.

The first two salsas quickly came together. The fiery orange and apple salsa contained two dice Valencia oranges and two diced granny smith apples with ground cumin and the juice of two limes.

Red and green bell peppers, roasted and cut into strips, and flavored with a quick spicy vinaigrette (vegetable oil, white vinegar, chili powder, salt and pepper) formed a sweet pepper salsa.

I switched gears by the time I got to make a salsa fresca. When I first posed the idea of serving leftovers from the Friday barbecue, one instructor doubled her request for something other than leftovers. She may have thought I was going to throw a plate of warmed-over hamburger patties and sausages on the table.

Inter-session meals are the perfect time to get rid of the few leftovers in the refrigerator. I rarely have sufficient quantity to feed the whole camp. Inter-session gives me the opportunity to mold the leftovers into something new.

So, ingenuity and the desire to fulfill instructor requests for adult food drive many of my ideas for inter-session meals, which run from Saturday lunch to Sunday lunch. Once campers for the next session arrive on Sunday afternoon, I'm back on the two-week cycle menu.

My original thought was to slice the 22 Polish sausages and saute them with tomatoes, onions and sweet peppers. Leftover Boca burgers would form the basis for the vegetarian option.

With my newly revised menu in my heads, I figured the orange and apple salsa could double as a fruit salad, while the sweet pepper salsa would make a good relish for Polish sausage sandwiches with melted cheese – a quick camp version of the famed Philly cheese steak sandwich.

I slice the tomatoes for the salsa fresca and marinated them in a quick vinaigrette with garlic and basil. It only took a few minutes to slice onions, green bell peppers and tomatoes for the sandwiches.

To complete the sandwiches, I sauteed the onions and sweet peppers in a large cast iron skillet, then added sliced Polish sausages. Once the sausages came to temperature, I spooned the mixture onto toasted hamburger buns, topped with sliced cheese and melted the cheese in a 350-degree oven.

Note: In the last two pictures, the sandwiches with the bell pepper on top of the cheese are vegetarian sandwiches. This helped me identify them from the meat sandwiches.

Friday, July 04, 2008

Camp 2008 -- Goal #2: Reduce end-of-camp donations

The second goal is to reduce end-of-camp donations to less than 4.5 percent of total purchases (when measured in dollars).

Cooking for or a stand-alone camp presents several inventory management issues. Key among them is getting rid of perishable inventory at the end of the week or weekend. We can't hold perishable food until the next camp, some 51 weeks away.

Dutch oven chocolate cream pie with cookie crust. Five (14-inch) Dutch ovens fed 135 campers and staff. You can serve approximately 15 to 25 portions from each large oven.

In an ideal world, the chef purchases just enough food for the campers. You're okay as long as the campers eat all the food that is prepared and presented to them. But few work in such an environment.

Products like fresh tomatoes, lettuce mix and milk give me the most problems. Each year, I adjust my order based on usage and remaining stock from the prior year. The number of anticipated campers also factors into the amount of food that I purchase.

Some years, my adjustments work. In other years the campers eat less (for a variety of reasons) and I'm faced with large quantities of leftover stock.

Now that it's Friday, I'm well on my way to achieving my goal of reducing the end-of-camp donations. Last week when I submitted by purchase order to Sysco, I was able to reduce my order by 10 to 20 cases.

I don't see a need to purchase an unneeded product just so I can donate it to the next camp. While it benefits that camp, it costs our camp money at a time when budgets are tight.

I've been monitoring the remaining food stocks closely and adjusting the menu to use these stocks up before tomorrow morning. My sous chef and I discuss the menu day and work on strategies to reduce excess stock. I'm confident that, at this point in the week, that my end-of-camp donations will come in much less than four percent.

Instead of making more cookies with the two remaining boxes of cookie mix, I used them to form the crust for a Dutch oven chocolate cream pie for lunch today.

DUTCH OVEN CHOCOLATE CREAM PIE WITH COOKIE CRUST

This morning, for instance, I made a Dutch oven chocolate cream pie in five (14-inch) camp ovens. I took the remaining two (5-pound) boxes of basic cookie mix and made cookie dough using the instructions on the box. I then pressed 2 pounds cookie dough into each 14-inch camp oven. It doesn't matter if you use regular or deep-style ovens for this recipe.

After baking the cookie dough over charcoal for 350 degrees F. for approximately 20 minutes, I used eggs, milk and sugar (all excess stock at this point) to make a chocolate cream pie filling from scratch. I cooled the filling and then poured 1-1/2 quarts over the cookie pie crust in each oven. You can also use your favorite instant pie filling if desired.

The five Dutch ovens fed 135 hungry campers during our Independence Day cookout. This is but one example of a way to use excess stocks.

Tuesday, July 01, 2008

Camp 2008 -- Soup from leftovers

Remember, one of my goals this year is to reduce the leftover load on breakfast Saturday morning. Instead of preparing Navy bean soup as planned, I made a cheesy potato soup with broccoli from leftover from the first two days. This helped reduce our leftovers by three dishes.

First, you must safely cool the leftover food. Cool leftover food through the danger zone (135 to 41 degrees F. ) by placing the pan in an ice water bath. Most state and local laws in the U.S. allow you to use the two-stage cooling method. You have two hours to cool the leftovers from 135 to 70 degrees and an additional four hours to cool the food from 70 down to 41 degrees or lower.


This pan of leftover pan of sausage gravy is in the second phase of cooling.

Once the leftovers have been properly cooled, store them in the refrigerator at 41 degrees or less. Use the leftovers as quickly as possible, but always within seven days.

To prepare the soup, I placed 5 quarts cheese sauce in a double boiler with 2 quarts fresh milk. I then added 2 quarts leftover cottage fried potatoes and 3 quarts leftover broccoli. I stirred. You then have (by law) two hours to heat the soup (or any leftover dish) to 165 degrees. It took 1-1/2 hours to heat the soup to the proper temperature.

I didn't measure the finished product. You should get about 25 (6-ounce) servings from this soup. Remember, the quantity you make will depend on the quantity of ingredients that you use for the soup.

Saturday, June 28, 2008

Camp 2008 -- Goal #1: Reduce leftovers

The first goal is to reduce the volume of leftovers we serve on Saturday.

Although breakfast on Saturday is an impressive meal, it's too much food for our last meal. Most of the leftovers at tossed or packaged for home use by the cooks.

It's hard to convince 90 to 120 campers to eat all the camp's leftovers when they were up half the night eating pizza (a treat of the counselors). Home is all that's on their mind at this point in the week. Plus, many have planned off-camp gatherings at local fast food restaurants.

Since the camp's inaugural year in 2002, I've used creative ways to use camp leftovers. Repackaging has worked for some (see Thomas Jefferson frittata). I've billed Thursday as "Catch Up Day" on the menu for about three years.

Although it may be a challenge because registration numbers are down this year, my goal is to closely monitor the amount of food we prepare for each meal. For many meals I've purchased one or two cases or boxes less than last year. I'd rather cook less food than to be faced with excessive leftovers.

Unfortunately, registration numbers will likely come at about 5 to 10 campers less than the director's planning number. I may have too much food even though I trimmed my Sysco purchase by 20 or more cases. Time will tell.

To accomplish this goal, I plan to watch my instructions closely on the food production worksheet. I'll have more to say about this process in goal number 3.

Tuesday, March 18, 2008

Beef hash

I had a rare chance to listen to the Food Guy and Marcy radio show Sunday afternoon, hosted by Food Network chef Guy "Guido" Fieri and Marcy Smothers, wife of Tom Smothers. To preview to St. Patrick's Day food festivities, the hosts talked about their favorite corned beef and cabbage recipes.

Somewhere in the hour, Fieri explained how he makes corned beef hash. His basic formula is a 1:1 ratio of beef to potatoes. Other than onions, garlic and seasonings, Fieri keeps the recipe simple.

This prompted me to think about preparing beef hash for dinner. With a leftover beef tritip roast in the refrigerator, I cook an un-corned beef version of classic hash last night.

I ground the beef, potatoes and onion together in an old Climax No. 50 cast iron meat grinder. Other than salt and pepper, that was the recipe. The best part of eating the classic dish of beef hash are the accompanying poached eggs, catsup and hot sauce.

A note of caution: Don't grind the ingredients too fine as I did. This particular model doesn't have a blade to cut small chunks off small chunks of meat as the auger pushes it through grinding plate.

Although the meat didn't fare well as hoped, the dish was still good. Perfectly ground potatoes and onions had a way of canceling out the stringy beef. The hash was full of flavor. (And the leftovers were even better Wednesday morning!)

A medium or coarse grinding plate produces a coarser hash. Ideally, use a plate with 1/4- or 3/8-inch holes. In fact, supermarket butchers commonly use a 3/8-inch grinding plate to make chili grind.

If you can, use a meat grinder that has a grinder blade that's mounted outside the plate. This cuts the meat into nice, even balls. Make sure the blade is sharp to for even, consistent cutting.

If you prefer, use my corned beef hash recipe from 2005. It gives you a chunkier texture. Substitute beef for corned beef if desired.

BEEF HASH

Vary ingredients to suit the tastes of your family. Replace some of the onion with green bell pepper or celery if desired.

Leftover beef roast
Potatoes, peeled if desired
Onion
Vegetable oil
Salt and black pepper
Dried thyme
Catsup

Finley chop or grind beef, potatoes and onion in roughly equal portions into a bowl. Lightly season with salt and pepper and dried thyme. Toss to combine.

Heat a large cast-iron skillet over medium-high heat. Add enough vegetable oil to coat the bottom of the skillet. Add several hands full of hash to the skillet and spread to level, about 1/2- to 3/4-inch deep. Work in batched for large amounts.

Brown hash, then turn with a spatula or flat spoon. Cook 10 minutes or until the potatoes are fully through and the hash is hot. Serve with catsup.

Sunday, July 09, 2006

Camp -- We'll Make Do

On Thursday each year, we offer peanut butter, dill pickle and mayonnaise sandwiches to the campers as an adventuresome alternative to grilled cheese. Although fewer than 10 accept the challenge each year, everyone now knows my favorite peanut butter sandwich!

Last Thursday and Friday the cooks persistently informed that we needed to make a Safeway run. We were already running out of catsup, margarine, white sugar, vegetable oil and dry cereal.

It's human nature. The cooks see that we're out of one or more products and assume that we need to run to the market and replenish the cupboards. I know that my cooks had the camp's best interest in kind when they made the suggestion.

But I had one consistent answer throughout the week: "No, we'll make do."

As chef, I have a job to perform. Budget and the need to use excess stock drove my response. Although I came in about $300 under budget for the week, I saw little need to spend more money. I knew with a little ingenuity, we'd make do.

There are several reasons for running low on stock. This year, the 20 extra campers caught us all by surprise late in the week before camp. We used the last 32 boxes of cereal Friday morning. I had cut my cereal order from five cases to four because the original estimate was for 140 campers and staff, not 165.

I generally buy a one-gallon jug of oil for the week. The olive-vegetable oil mixture is great for salads. But when the jug starts to run on empty, I look for alternatives. Wednesday or Thursday, I instructed my salad cook to assemble a tomato-cucumber salad.

Instead of mixing a vinaigrette dressing, I had her thin the creamy Italian dressing with cider vinegar and milk. It worked well. This was a good use of creamy Italian because we always have one or two quarts left at the end of camp.

With few exceptions -- margarine and cereal among them -- we substituted stock on hand for the missing items. I had my baker use raisin brand and bran flakes in place of the rolled oats for the apple crisp topping. We purchased margarine for toast only. Bacon grease worked well on Friday (we don't serve bacon until Friday).

We served oatmeal for the first time in five years Friday. As an aside, I plan to serve oatmeal maybe two or three days next year. It was very popular.

A word to the wise: Watch your stock. For many dishes, margarine, shortening and oil are interchangeable. But a drive to conserve salad oil, for instance, may push the cooks into using greater quantities of margarine. As chef, you need to constantly balance like products. Ask, "Is margarine best for this menu item?" Or, "Can I use shortening or bacon fat?"

Thursday, July 06, 2006

Camp -- Thomas Jefferson Frittata

What do you do with two pans of leftover macaroni and cheese?

The answer: re-package and serve it for breakfast! Thomas Jefferson frittata to be precise. While not a true frittata, our leftover mac and cheese woke a few kids up this morning. It got most thinking, "What's the connection between Jefferson and mac and cheese?" (Jefferson is credited with bringing the first pasta machine to the U.S. from Italy in 1787.)

A slice of true frittata may have been nice next to an oven fresh cinnamon roll and 2-ounce sausage link. But remember, we didn't do anything to the mac and cheese -- only re-packaged it. In the end, 165 kids and adults only ate 24 servings.

I'll have more on leftovers later. Today is "catch up day" in the Northern California FC Camp kitchen.

Sunday, July 31, 2005

Camp 2005 -- Pot Luck Saturday

Camp finished yesterday with a breakfast "pot luck." This isn't your traditional pot luck where the guests share their favorite dish. At our camp kitchen, the pot luck is designed to empty the refrigerator so that we can go home.

You might say that each staff member is the kitchen was given a chance to show off his or her favorite dish from the week. According to my inventory as we emptied the contents of the walk-in onto the center table, we had no less than 17 items to dispose of. I recorded this inventory in my notebook as we emptied the reefer.

The center table about half-way through our unloading operation.

Here's the tally:

  1. A 2-inch full-sized hotel pan of lasagna from Wednesday dinner.
  2. A half-sized hotel pan of Thursday's brown gravy.
  3. Two soup bowls of ground cooked beef.
  4. 39 grilled hamburgers from the All-American BBQ Friday.
  5. 23 grilled hot dogs from the BBQ.
  6. 8 pounds of raw bacon.
  7. 10 pounds of raw sausage links.
  8. 14 baked potatoes.
  9. 15 pounds seasoned cooked diced chicken from quesadillas Friday (I purchased too much pulled chicken meat).
  10. 10 dozen flour tortillas.
  11. 8 dozen eggs.
  12. A full 4-inch full-sized hotel pan of baked beans from the BBQ.
  13. 13 pounds of shredded cheddar cheese.
  14. 1 quart of barbecued pulled chicken from Thursday's lunch.
  15. A small pan of sauteed onions and bell peppers.
  16. A 2-inch full-sized hotel pan of sliced tomatoes from the BBQ.
  17. A 4-inch full-sized hotel pan of braised red cabbage from Thursday's roast pork loin dinner.

I'm sure that your mind said, "Breakfast burritos!" as you browsed the list. We prepared 100 breakfast burritos from scrambled eggs, seasoned diced chicken, torillas and cheese. They've become a Saturday morning tradition at our camp. I would've made salsa from the tomatoes, but I didn't have enough hot peppers.

From left to right: sausage bacon, hot dogs and bacon; lasagna; barbecued chicken; and SOS.

After making the burritos, we heated everything except the red cabbage and placed it on the tables in the dining room. My staff wouldn't let me serve braised red cabbage for breakfast. (Instead, several of us took it home -- I have two tubs in my home freezer!)

Some of the items were well accepted, burritos included. After a 30-minute meal from 9 a.m. to 9:30 a.m., we found that the bacon, sausage and hot dogs were fast sellers. The kids attacked about half of the lasagna, a few hamburgers, some of the SOS (brown gravy and crumbled beef), all of the fried potatoes (remember the baked potatoes?) and about half of the barbecued pulled chicken.

We saved the Cocoa Puffs and Cocoa Krispies for Saturday because they're so popular. One of the drawbacks of buying the Kelloggs and G.M. variety packs is that the campers tend to favor the sweeter breakfast cereals. They shun healthy cereals like Total, which we also saved for Saturday.

The rest of the meal consisted of dry cereal and milk (we had to buy seven gallons Friday night), fresh fruit, orange juice cartons and a coffee cake made from biscuit mix and canned apples.

Thursday, July 28, 2005

Camp -2005 - Catch Up Day and Bread Pudding

Thursday is "catch up day" in the Northern California FC Camp kitchen. It allows the cooks to catch our breath and deplete some of the leftovers from the previous four days.

Leftovers are one of the 10 plagues of a poorly managed camp kitchen. Children's appetites vary from day to day and year to year. What's popular this year will flop next year. All camp kitchens -- including well-managed kitchens -- must plan to deal with leftovers.

To use most leftovers, we often reheat them to 165 degrees and place them directly on the serving line. Monday we served the leftover chicken tenders as an extra. And today, the French fries from Tuesday went on the serving line at lunch.

But some products, like 32 slices of French toast made from thick Texas toast, can't be re-heated. No one wants to eat leftover French toast. Nor will my culinary conscience won't allow it. So, I baked a hotel pan of bread pudding this morning for the lunchtime dessert.

Overheard in the dining room: Two young boys, both about 10 years old, were going down the self service line, when they came to the bread pudding. "What's that?" asked the first boy. "I don't know," said the second boy, "but if Steve made it, it's gotta be good!"
The boys were right. We only had three servings leftover!

Other leftovers used today: 30 barbecued chicken quarters, meat pulled, left from Tuesday's dinner, mixed with 2 gallons barbecue sauce and 4 sliced onions to create BBQ chicken sandwiches; grilled cheese and luncheon meat sandwiches (leftover bologna, salami and ham from Monday's lunch); and 12 pints of strawberries were used for a special dessert for the Cabin 1 girls (presented to them by the senior boys in Cabin 9).

Bread pudding, made from leftover French toast, is ready for the oven. Bake the pudding in a water bath as you'd any custard. Place both pans in the oven, them pour hot water into the larger pan to about one-inch up the side of the bread pudding pan.

BREAD PUDDING

This recipe yields one 12- by 20- by 4-inch hotel pan. Serve the bread pudding with a #10 scoop. Serves 75.

3 pounds white bread
12 ounces butter, melted
3 dozen eggs
3 cups granulated sugar
1-1/2 teaspoon salt
1-1/2 ounces vanilla extract
3-3/4 quarts milk
Cinnamon, to taste
Nutmeg, to taste

Cube bread and place in full-sized hotel pan. Drizzle butter over bread cubes. Mix together eggs, sugar, salt and vanilla extract until thoroughly combined. Add milk and mix to combine.

Pour egg mixture over bread cubes. Let stand, refrigerated, 1 hour or longer, so the bread absorbs the eggs mixture. If necessary, push bread down into pan once or twice after mixture has had time to stand.

Sprinkle top with cinnamon and nutmeg. Set pan in larger pan containing about 1-inch of hot water. Bake in preheated 350-degree oven for 1 hour or until set.

Serve warm or cold. Garnish with whipped cream, fruit puree or confectioners sugar.

Tuesday, April 12, 2005

Dutch Oven Turkey Dressing Casserole

Who says leftover turkey is the exclusive domain of Thanksgiving? When I was growing up in California's San Joaquin Valley, whole turkeys were only available in the fall. Since my mother roasted a 20- to 23-pound tom, we had sufficient leftover turkey meat to create sandwiches and casseroles for a week or more.

Today, turkey can be purchased year-round. It's fun to roast a 15-pound bird just so you can have leftovers. You can also purchase turkey breasts, thighs and drumsticks. For the test recipe, I roasted a 1-3/4-pound turkey thigh for 60 minutes. The thigh yielded 2-3/4 cups of diced meat, along with a nice, crisp piece of skin.

Since cooking is often a function of what's in the cupboard, I cubed a sourdough rosemary baguette for the dressing. It was left from a dinner that never materialized last week. Consequently, I didn't add sage to the recipe.

A package of sliced cremini mushrooms sautéed with the onions added an earthy element to the stuffing. Other ingredients compliment the turkey as well. Try combinations such as sausage, chestnuts and apples; red currents and dried cherries; or dried pears and roasted hazelnuts.


DUTCH OVEN TURKEY DRESSING CASSEROLE

Cavendar's all-purpose Greek seasoning is available in your grocer's spice section. You may locate the seasoning in the ethic food isle as I did. Use poultry seasoning in place of Cavendar's if desired. Since salt is listed as the first ingredient on the label, you may want to add salt after tasting the dressing.

10-12 slices dried white bread, cut into 1-inch cubes
2 teaspoons Cavendar's all-purpose Greek seasoning
1/2 teaspoon ground sage
Salt and pepper, to taste
1 large onion, chopped
1 bunch green onions, chopped
5 stalks celery, chopped
1/2 stick butter
4 boiled eggs, peeled and chopped
2-3 cups cooked turkey, cut into 1-inch cubes
2-3 cups turkey or chicken broth

Place cubed bread in large bowl. Add Cavendar's, sage, salt and pepper and stir to mix. Set aside. In heated Dutch oven, sauté chopped onions and celery in butter until tender. Remove from Dutch oven and add to bread. Add eggs and turkey. Stir to mix well.

Pour broth over mixture 1 cup at a time so as not to get it too soupy. You want it nice and moist. Pour into a 12-inch Dutch oven. Bake about 1 hour at 350 degrees. Using charcoal: 16 coals on the lid and 8 under the Dutch oven.

Serve hot with gravy or cranberry sauce. It's also good served plain.

Bakin' Bill Johnson prepared Dutch oven turkey dressing casserole for KUTV-2 in Salt Lake City on November 26, 2004. Click for photographs from a TV shoot that Bill and I did in San Mateo, California last February.

Saturday, March 05, 2005

Breakfast, Photographs and Lunch ...

It’s time to stop the madness ...

We’re still grazing from doggy bags. Breakfast this morning was leftover fried rice and pork chow main. Only two meats to go -- a Styrofoam clamshell with sweet and sour chicken and chow main plus rice, beans and a cup of Colina De Oro’s house salsa.

In case you miss the photographs, please be patient. It seems Blogger isn’t talking to Hello software right now. I’ll post photos as soon as I can.

Leftover London broil sandwiches hit the spot for lunch. Today, I spread yogurt-horseradish sauce on whole wheat bread in place of my customary mayonnaise and yellow mustard. The sauce was a hit.

I originally made the sauce for the forthcoming picture of last night’s dinner. But I read the instructions after I assembled the recipe. That’s when I discovered that I had missed the crucial step to drain the yogurt. It has a slight yogurt aftertaste, but that may go away when I prepare the sauce properly.

Here’s the recipe in case you’re interested. I’ll report back when I make it right.

YOGURT-HORSERADISH SAUCE

1 pound plain yogurt
2 tablespoons horseradish
2 tablespoons chopped chives
1/2 teaspoon salt
Dash white pepper

In strainer lined with a coffee filter and set over a bowl, drain yogurt for two hours. Discard liquid, place yogurt in bowl and fold in remaining ingredients. Cover and refrigerate. Serve on baked potatoes or use as a sandwich spread.

Recipe by the United States Potato Board.