Showing posts with label charcoal. Show all posts

Saturday, November 12, 2016

Sicilian-style cast iron skillet pizza

I haven't prepared skillet pizza in over four years for 'Round the Chuckbox. In February 2012, I baked a pizza in a 17-inch cast iron skillet when my baking stone "bit the dust." Three month later, when the home oven quit working, I baked a take 'n bake pizza in an inverted 14-inch Dutch oven. I felt it was time to feature another cast iron pizza.

After testing a recipe from the Serious Eats website two weeks ago, cast iron skillet pizza sounded good. I wanted a recipe that I can use at my summer job and when camping. This recipe will serve both purposes. It can either be baked in a half-sized (13x18-inch) sheet pan or in two large cast iron skillets (10- to 12-inch diameter).

The camp edition of the pizza can be baked with charcoal briquettes or inside the home oven. While this recipe uses a stand mixer (I use a Kitchen Aid 5-quart mixer), the Serious Eats website has instructions for hand-mixing the dough. You can use an inverted Dutch oven as well. I will post hand-mixing instructions when I get a chance.

The full-sized (18x26-inch) sheet pan will be used for the camp. It takes six to eight sheet pan pizzas for each 100 campers. Pizza is often pared with honey barbecued chicken wings, pasta salad and a loaded salad bar. We typically feature cheese pizza, pepperoni pizza, vegan pizza and a meat-lover's pizza.

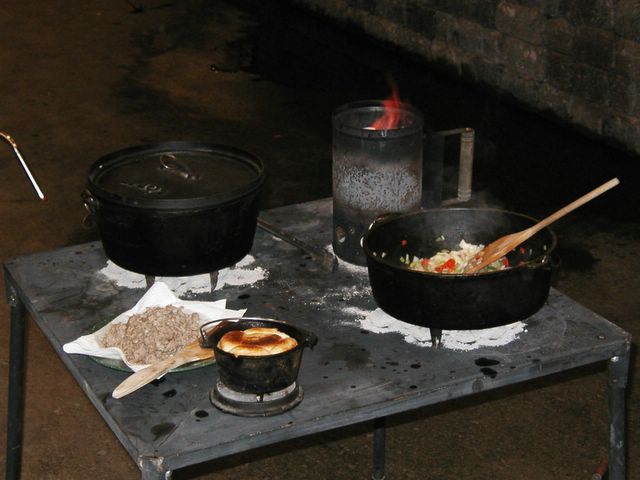
I proofed the dough on the picnic table on the patio. The skillet in the foreground in a Lodge No. 12. The other one is a Wagner 1891. My wife and I purchased the Wagner in the early 1980s when we were first married.
The pizza is ready for toppings. Each skillet pizza needs 1/4- to 1/2-cup sauce, 3 to 4 ounces shredded cheese and 2 to 4 ounces meat (if used). I added a bunch of sauteed spinach to both pizzas. Four ounces sliced chicken sausage with feta and spinach was used on the larger pizza.
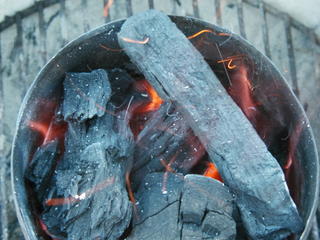
You have to pile the charcoal briquettes to achieve a close approximation of 550 degrees F. Lighting 10 extra briquettes will give you extra heat should you need it.
Finished pizzas. The crust could've been a bit more crisp. The smaller pizza is vegetarian.
Sheet pan pizza prepared from the same recipe. I will use this recipe to bake pizza in full-sized (18x26-inch) sheet pans for Oakland Feather River Camp, where I am the executive chef. Four sheet pans yield 96 slices.
SICILIAN-STYLE CAST IRON SKILLET PIZZA

This recipe requires two large cast iron skillets, 10- to 13-inches in diameter. Match each skillet to the rimmed Dutch oven lid (or camp-style Dutch oven) that fits best. The 12-inch lid will fit the smaller skillet while the larger skillets will require the 14-inch lid.

To bake in a rimmed 13x18-inch half-sized sheet pan, pour remaining oil (in second paragraph of instructions) into a half sheet pan. Place dough on sheet pan and let rise as directed. About 30 minutes before baking, preheat home oven to 550 degrees with rack in the middle position. Proceed to stretch dough to the sides and corners of the pan, as directed. Double toppings and bake 15 to 20.

This recipe was adapted from the SeriousEats.com website.

17-1/2 ounces bread or all-purpose flour
2 teaspoons kosher salt
1 teaspoon instant yeast
1/2 cup olive oil, divided
12-1/4 ounces room temperature water

Combine flour, salt, yeast and 2 tablespoons oil in the bowl of a stand mixer. Whisk to combine. Add water and mix on medium speed until it comes together and no dry flour remains. Increase speed to medium-high and mix until the dough is stretchy and smooth, about 6 minutes. The dough should stick to the bottom of the bowl but pull away from the sides.

Divide oil between 2 cast iron skillets and spread over surface with hands. Divide dough in half and place one piece in each. (Add slightly more dough to the larger skillet when using mismatched pans.) Rub top surface with oil until thoroughly coated. Cover with plastic wrap. Allow to rise at room temperature until dough has spread out to nearly touch each rim of each skillet, about 2 hours.

Carefully remove plastic wrap. Using oiled hands and being as gentle as possible to maintain air bubbles, push and stretch dough into corners of each skillet by pressing out from the center and lifting and stretching it beyond the rim of each skillet. The dough should pull back until the skillet is just filled with dough.

Light 45 to 60 charcoal briquettes in a charcoal chimney about 30 minutes before the dough is ready. One lid is needed since you will bake the pizzas one at a time. For 550 degrees, use around 45 briquettes (30 on lid and 15 under skillet) on the 12-in camp-style Dutch oven lid. The 14-inch lid requires around 60 briquettes (40 on lid and 20 under skillet).

Top each pizza with about 1/3- to 1/2-cup sauce, 3 to 4 ounces shredded mozzarella cheese, plus additional toppings as desired. Place the first skillet on trivet. Place the lid from a Dutch oven on top of the skillet. Bake with charcoal briquettes for 550 degrees until bottom is crisp and top surface is bubbling, 15 to 30 minutes. Repeat for second skillet. Allow to cool at room temperature for 5 minutes. Slice as desired.

Saturday, March 02, 2013

Cooking with snow capped charcoal

Last time I baked pizza in a cast iron skillet, I had intended to bake the pizza in a 14-inch Dutch oven. I set up a chimney of charcoal briquettes on the patio. Switching direction midway through the process, the charcoal sat outside on the patio for three weeks.

In the meantime, the Sierra Nevada foothills received five inches of snow. A dome of snow capped the chimney. With melting snow dripping down the chimney, I figured the charcoal was lost.

I didn't bother to inspect the charcoal as it dried.

The Dutch ovens remained in the garage through most of February. Itching to cook outdoors today, I rescued a 10-inch camp oven and set it on the Dutch oven table next to the charcoal chimney. With a new storm on the horizon, this seemed like the best time to use the charcoal.

I lit the wadded newsprint under the chimney. Blue smoke drifted into the backyard within minutes. A week of unseasonably warm weather dried the charcoal. Even the paper immediately caught fire. The family was enjoying a nice meal within the hour.

I'm happy. One of my favorite Dutch oven meals, Mexican rice with chicken (arroz con pollo), was on the menu. And I didn't have to discard a chimney of charcoal.

Thursday, September 07, 2006

How Well Do You Like the New Kingsford Charcoal?

Don Mason asked this question in his summer newsletter. I introduced the "new improved" charcoal last April in this blog. At the time, I had not seen the new Kingsford brand charcoal with "fire grooves."

I have since purchased two bags, one regular and the other mesquite. Don and I'd like to hear about your experiences with the new product. Is it better? Or worst than the old stuff. Let Don and I know.

Here are Don's questions:

  1. Does it last as long as the old Kingsford charcoal (without the "fire grooves")?
  2. Is there more ash from the new charcoal?
  3. Does it burn hotter than the old product?

You can post your answers under the comment section for this blog. Or, you can email your response to Don at iron_kettle@hotmail.com. Either way, we'd like to hear about your experiences.

Friday, April 07, 2006

New Kingsford Charcoal Product Line

According to a post on the International Dutch Oven Society Forum, "Kingsford is at it again." Apparently, in the past few years, Kingsford has changed its formulation of charcoal briquettes.

In the past few years, the forum has been alive with charges that foreign material in the charcoal impedes its burning qualities. I've had some poor quality Kingsford charcoal a few years ago -- a late summer purchase from Costco in 2004, I believe. Beyond a few bad experiences, my Kingsford charcoal (and that's the only brand of briquettes that I use) has performed well for Dutch oven cooking and for grilling.

Kingsford has revamped its charcoal line for 2006. Although I've yet to see the new charcoal with "sure fire groves," the idea makes sense from a scientific standpoint. Anytime you increase the surface area of a product, like a charcoal briquette, you increase the area that will catch fire and burn. It stands to reason that the should burn faster.

The question will be how much faster and is there any measurable improvement over traditional briquettes?

Here's The Virtual Weber Bullet's assessment of Kingsford's new product. Since I'm posting on break at work, I haven't had time to review their review yet. More to come ....

Saturday, September 03, 2005

BBQ Junkie -- A California Barbecue Blog Worth Viewing

Looking for an outdoor blog dedicated to California barbecue? Try BBQ Junkie -- a Los Angeles barbecue odyssey.

The tag line says it all: "BBQ Junkie is a blog that focuses on what's happening in the Southern California barbecue scene. Here you will find recipes, restaurant reviews, book reviews, and other useful information on barbecue."

BBQ Junkie is worth a visit for dedicated BBQ fanatics. It appears to have a good mix of reports from the Southern California barbecue scene.

Recent posts include: Charcoal chimney starter, Becoming a Certified BBQ Judge and Hawaiian BBQ Kalua Pig.

Saturday, April 23, 2005

Charcoal Light Test

I saw an interesting piece in the Sacramento Bee House & Garden Section this morning. Garden writer Dan Vierra settled the mystery of how long it takes to light charcoal briquettes. The results were "enlightening" (Dan's word, not mine).

He studied five common charcoal lighting strategies: lighter fluid, chimney started, electric heat element, Kingsford Match Light charcoal and Duraflame Fresh Light Liquid Gel charcoal lighter.

Dan lit a fresh batch of 50 briquettes in a clean Weber kettle grill for each test. He explained his unscientific methodology: "Coals were declared ready when 90 percent of the surface had burned gray."


Charcoal stands ready in a weathered chimney starter.

The results: The charcoal chimney starter came out on top at 17 minutes from lighting to ready. "Not much to look at, but the metal chimney if efficient, fast and no chemicals are required," said Dan.

I agree. My experience shows that a chimney starter lights the charcoal in 15 to 20 minutes. Remember, safety comes first. Wear heavy gloves when dumping the charcoal onto the grill plate. Avoid nasty foot injuries from falling briquette firebombs and keep the hot chimney away from small children and pets.

How did the competing methods fare? Kingsford Match Light took 19 minutes. Not bad, especially when you want to avoid the fuss. It's "much safer than the douse-and-stand-back method of lighting," declared Dan. Watch chemical residue when grilling foods, warns Dan.

Electric heat element and charcoal lighter fluid came in third (at 22 minutes) and fourth (24 minutes), respectively. The liquid gel, which you squirt into piled briquettes, made a dismal showing 68 minutes.

Note: You'll have to register to view the Sacramento Bee website.