
Showing posts with label cheese and dairy. Show all posts
Showing posts with label cheese and dairy. Show all posts
Saturday, August 26, 2017

Sunday, June 29, 2014
Baked asparagus frittata with basil and Swiss cheese
 |
| Set-up for baked asparagus frittata with basil and Swiss cheese. |
To begin, I cut one pound of asparagus for each 2-1/2-inch hotel pan. Next the asparagus with a splash of canola-olive blend oil went into each pan. Five pans were placed in a 325-degree convection oven for around 10 minutes.
Once the asparagus was a bright green color, I removed the pans and poured in three cartons of liquid egg, along with a handful of chopped fresh basil and parsley and grated Parmesan cheese. I returned the pans to the oven and baked until the eggs was almost set. Each pans was then topped with 15 slices of Swiss cheese and given another five minutes in the oven.
The frittata was a hit. One campers said, "I've never seen that up here." I find that one pan of frittata feeds 35 family campers at Oakland Feather River Camp. We also place a pan of plain scrambled eggs on the serving line for campers that don't like frittata.
Monday, December 10, 2012
Creamed ground beef
Each year I receive two or three requests for the old military recipe for creamed beef. Known as SOS or "stuff" on a shingle, most ask for the recipe from the time period of their service to this great nation. In view of a recent request for a recipe that's suitable for a "small family," I have posted such a recipe. It's based on one pound of ground beef, which should be sufficient for the average family.
Click for the recipe for 100 portions if you need to serve a crowd. It's based on the 1969 U.S. Armed Forces Recipe Service card No. L-30.
I "enjoyed when it was served in the (CPO) mess," wrote a retired Navy chief petty officer.
CREAMED GROUND BEEF
1 pound ground beef
5-1/2 tablespoons all-purpose flour
1/4 teaspoon black pepper
1-1/2 teaspoons beef base
3-1/4 cups milk
1/2 teaspoon Worcestershire sauce
Brown beef in its own fat in an saucepan or skillet. Drain excess fat. Add flour, pepper and beef base to beef. Mix thoroughly and cook until flour is absorbed.
Add milk and Worcestershire sauce to beef mixture. Heat to a simmer, stirring frequently. Cook until thickened. Adjust seasoning with salt, pepper and Worcestershire sauce to taste. Serves 4 to 6.
Thursday, July 16, 2009
What do you do with excess stock of cream cheese and mozzarella?
Here's a question that I answered at Growlies Recipe Exchange and Party Planning Board this afternoon. ReBecca, who appears to cook at a homeless shelter somewhere in Canada or the U.S., posed this question recently:
If mozzarella is too stringy once it melts, try combining it with shredded cheddar. The two flavors will compliment each other.
Cheesy potato soup, rich two- or three-cheese macaroni and cheese or salad topping are just a few of ways to use the shredded mozzarella cheese. Use extra cheese in each recipe as long as your inventory holds.
Consult cookbooks like Food For Fifty or Professional Cooking for ideas. They're too numerous to print on this blog.
You can also make a versatile cream cheese and mozzarella mixture. Use it for any number of dishes, both hot and cold.
Mix cream cheese, shredded mozzarella, garlic powder and hot pepper sauce. Season lightly with salt and pepper while whipping in a mixer bowl. Although you should be careful with the hot sauce, I suspect these guys will appreciate it.
Use the mixture on:
EGG AND SAUSAGE BAKE
40 ounces sliced bread
9 pounds bulk sausage
40 ounces cheddar cheese, shredded
72 ounces eggs (about 42 total), beaten
3 quarts milk
1-1/2 tablespoons dry mustard
Cut bread in cubes. Cover bottom of 2 greased 12x20x2-inch baking pans with bread cubes. Pans should be well covered.
Brown sausage. Drain well. Spread cheese and sausage over bread cubes.
Combine eggs, milk, and mustard. Pour over mixture in pans, 2-1/2 quarts per pan. May be mixed, covered, and refrigerated overnight.
Bake uncovered at 325 degrees F for approximately 1 hour or until set, 180-degree internal end-point temperature. If browning too fast, cover with foil.
Cut each pan 4x6. Recipe yields 2 (12x20x2-inch) hotel pans.
VARIATIONS:
Sausage-Potato Bake. Substitute frozen hashed brown potatoes for bread cubes.
Egg-Potato Bake. Delete sausage. Substitute frozen hashed brown potatoes for bread cubes.
I have a situation here. I have a woman who was so thrilled with the poor man's fettuccine Alfredo (cream cheese recipe) that she now brings me cream cheese and shredded mozzarella almost every week now.There are many things do do with the mozzarella and cream cheeses. First, you can use the shredded mozzarella in place of most shredded cheeses the shelter acquires.
I can't make any more fettuccine because my homeless guys are starting to complain; plus-I would love something other than pasta since we already serve spaghetti every week for the main course.
My meals are the "to-go" meals to sustain our homeless community for the 'next' day when there are no churches making meals. SO ... does anyone have any recipes for copious amounts of sausage, cream cheese and shredded mozzarella? Thanks!
If mozzarella is too stringy once it melts, try combining it with shredded cheddar. The two flavors will compliment each other.
Cheesy potato soup, rich two- or three-cheese macaroni and cheese or salad topping are just a few of ways to use the shredded mozzarella cheese. Use extra cheese in each recipe as long as your inventory holds.
Consult cookbooks like Food For Fifty or Professional Cooking for ideas. They're too numerous to print on this blog.
You can also make a versatile cream cheese and mozzarella mixture. Use it for any number of dishes, both hot and cold.
Mix cream cheese, shredded mozzarella, garlic powder and hot pepper sauce. Season lightly with salt and pepper while whipping in a mixer bowl. Although you should be careful with the hot sauce, I suspect these guys will appreciate it.
Use the mixture on:
- Celery sticks in place of peanut butter; this is a good, filling appetizer
- Dip for crackers or chips
- Sliced French bread halves, baked under broiler until lightly browned; use any excess hamburger/hot dog buns, French rolls or other donated bread
- Twice-baked potatoes, baked under broiler until cheese melts and topping browns
EGG AND SAUSAGE BAKE
40 ounces sliced bread
9 pounds bulk sausage
40 ounces cheddar cheese, shredded
72 ounces eggs (about 42 total), beaten
3 quarts milk
1-1/2 tablespoons dry mustard
Cut bread in cubes. Cover bottom of 2 greased 12x20x2-inch baking pans with bread cubes. Pans should be well covered.
Brown sausage. Drain well. Spread cheese and sausage over bread cubes.
Combine eggs, milk, and mustard. Pour over mixture in pans, 2-1/2 quarts per pan. May be mixed, covered, and refrigerated overnight.
Bake uncovered at 325 degrees F for approximately 1 hour or until set, 180-degree internal end-point temperature. If browning too fast, cover with foil.
Cut each pan 4x6. Recipe yields 2 (12x20x2-inch) hotel pans.
VARIATIONS:
Sausage-Potato Bake. Substitute frozen hashed brown potatoes for bread cubes.
Egg-Potato Bake. Delete sausage. Substitute frozen hashed brown potatoes for bread cubes.
Saturday, July 04, 2009
Mark Twain on bacon
Debbie and I visited the Taylor Creek Visitor Center before dinner last Thursday. It was our day off and we were looking to relax and take in a few sights in the Lake Tahoe Basin. I always enjoy visiting the U.S. Forest Service centers because they carry a wide selection of historical books, wildlife guides and maps.
I picked up The Wit and Wisdom of Mark Twain: A Book of Quotes (Paul Negri, ed., Dover Publications: Mineola, N.Y., 1999), a collection of Twain’s sayings. Many were taken from his books, speeches and letters written over a writing career that spanned some five decades.
One quote that caught my attention was borrowed from Twain’s 1872 publication of Roughing It. Twain said, "Nothing helps scenery like bacon and eggs."
The full quote from Roughing It contains a bit more information. Although the line from this later version used "ham," I suspect he spoke of bacon, a common staple in the west.
Bacon is one of those foods that go with most anything. The smoky goodness of cured pork belly compliments a wide range of foods, even butter.
Yes, I said butter. As Debbie and I approached Loon Lake last Thursday, she asked me if I wanted to split the remaining piece of bacon from our breakfast at Ernie’s Coffee Shop. Never one to refuse bacon, I accepted.
My palette received a pleasant surprise when I bit into my half. It seems that Debbie had also saved the cup of whipped butter from her French toast. The bacon marinated in the butter as it melted in the afternoon sun.
If you agree that bacon and eggs improve your surroundings as Twain proposed, bacon and butter make the wilderness seem like the Garden of Eden.
The combination of two prized culinary fats made for a pleasurable end to a day of rest and relaxation. Here we were driving up to the boat landing for our ride back to camp, enjoying the lodgepole forest in the setting sun, munching on bacon and butter.
It’s a near perfect combination in the culinary scheme of things. I’m sure Twain would agree, bacon and butter make everything better, even scenery.
I picked up The Wit and Wisdom of Mark Twain: A Book of Quotes (Paul Negri, ed., Dover Publications: Mineola, N.Y., 1999), a collection of Twain’s sayings. Many were taken from his books, speeches and letters written over a writing career that spanned some five decades.
One quote that caught my attention was borrowed from Twain’s 1872 publication of Roughing It. Twain said, "Nothing helps scenery like bacon and eggs."
The full quote from Roughing It contains a bit more information. Although the line from this later version used "ham," I suspect he spoke of bacon, a common staple in the west.
And it was comfort in those succeeding days to sit up and contemplate the majestic panorama of mountains and valleys spread out below us and eat ham and hard boiled eggs while our spiritual natures revelled alternately in rainbows, thunderstorms, and peerless sunsets. Nothing helps scenery like ham and eggs (page 63).Bacon and eggs are among my favorite breakfast foods in camp. Twain is right--the salty goodness of bacon helps any setting.
Bacon is one of those foods that go with most anything. The smoky goodness of cured pork belly compliments a wide range of foods, even butter.
Yes, I said butter. As Debbie and I approached Loon Lake last Thursday, she asked me if I wanted to split the remaining piece of bacon from our breakfast at Ernie’s Coffee Shop. Never one to refuse bacon, I accepted.
My palette received a pleasant surprise when I bit into my half. It seems that Debbie had also saved the cup of whipped butter from her French toast. The bacon marinated in the butter as it melted in the afternoon sun.
If you agree that bacon and eggs improve your surroundings as Twain proposed, bacon and butter make the wilderness seem like the Garden of Eden.
The combination of two prized culinary fats made for a pleasurable end to a day of rest and relaxation. Here we were driving up to the boat landing for our ride back to camp, enjoying the lodgepole forest in the setting sun, munching on bacon and butter.
It’s a near perfect combination in the culinary scheme of things. I’m sure Twain would agree, bacon and butter make everything better, even scenery.
Tuesday, June 23, 2009
Powdered milk
Deer Crossing Camp uses a lot of powdered milk. With limited refrigeration, it's not practical to purchase and store large quantities of fresh milk at the camp.
All food must be brought to the camp by a boat. We just don't have any space in the camp's one reach-in refrigerator to store 20 or 30 gallons of milk for the week.
Each morning I make two gallons of milk from instant non-fat dry milk. For each gallon, I add:
5-1/3 cups instant non-fat dry milk
1/2 (12-ounce) can evaporated milk
Water
Since our water is cool in the morning, I usually make the milk in the morning. It doesn't make sense to make it at night, I don't have a lot of extra space in the refrigerator in the for two or three days after the food delivery.
Deer Crossing currently uses about 1-1/2 gallons of milk for 45 campers and staff. Most campers use the milk with their morning cereal. Space permitting, leftover milk is saved for the next morning or used during the day.
Friday, May 15, 2009
Bakery scales and pizza
I have long advocated the use of scales in the bakery. Measurement by weight is more accurate the by volume. This is especially true for the dry ingredients like flour.
The actual weight of a cup of flour, for instance, varies considerably. A cup of sifted bread flour weighs about 4 ounces while a cup of unsifted weighs about 4-3/4 ounces. The difference is considerable when working with multiple cups of flour.
 For consistent results, bakers weigh most of the ingredients. This includes the water and most other the wet ingredients. Although a "pint is a pound the world 'round," liquid measures vary in capacity, unlike scales.
The dough comes together nicely when weighing the ingredients. You'll achieve the right balance between flour and water (usually in the neighborhood of a 3:2 ratio by weight). If the dough is a little loose, you can work some additional flour into it.
After using a mechanical portion scale for 10 years, I purchased a digital scale last month. The digital scale is convenient. To measure, set a measuring container on the scale, press the tare button and it's ready to go.
To add a second ingredient without removing the first, press the tare bottom again and add the next ingredient. This method is helpful when you're going to sift the dry ingredients together.
I purchased the My Weight 7000DX digital scale (pictured) from Old Will Knot Scales on the Internet. The scale has a capacity of 7,000 grams or 15.45 pounds. With the right-sized measuring container, you can weigh enough flour for 15-pound batch of bread, pizza dough or pastry.
I plan to take the scale with me to camp this summer (without the bowl). Its slender profile easily fits inside a duffel bag with a few other must-have baking tools, like a dough cutter, plastic bowl scraper and lame.
 CHEESE PIZZA
This recipe makes enough for 4 (10- to 12-inch) pizzas. It'll yield 24 to 32 slices, depending on how you slice the pizzas. You can double the recipe when using the 5-quart Kitchen Aid mixer.
I provided baker's percent so you can adjust the recipe to fit the needs at your camp.
1 pound 12 ounces bread flour (100 baker's percent)
1/4 ounce instant yeast (.9%)
1/2 ounce table salt (1.8%)
1/4 ounce sugar (.9%)
3/4 ounce olive oil (2.7%)
1 pound warm water (57%)
3 ounces pizza sauce
4 ounces shredded cheese
Place flour, yeast, salt and sugar into 5-quart mixer bowl. Mix dry ingredients using paddle attachment. Replace paddle with dough hook. Knead dough for 15 minutes on medium speed.
Use widow pane test to determine if dough is kneaded long enough. Pinch off a small piece of dough and slowly stretch it like pizza dough. As you gently pull and rotate the dough, stretch it until a thin, translucent membrane forms. If it tears easily, continue kneading for a few more minutes and test again.
Roll pizza dough into a smooth ball on counter top. Place into a stainless steel or glass bowl. Add a little olive oil to the bowl and toss to coat. Cover with plastic wrap and ferment 45 minutes, until double in size.
Place the pizza stone onto bottom of a cold oven and turn the oven to its 500 degrees F. If the oven has coils on the oven floor, place the tile onto the lowest rack of the oven.
Split the pizza dough into 4 equal parts, about 11 ounces each. Flatten into a disk on counter top and then fold the dough into a ball. Let dough relax 5 to 10 minutes.
Work with 1 dough at a time. Flatten dough with hands on a slightly floured work surface. Starting at the center and working outwards, use your fingertips to press the dough to 1/2-inch thick.
Turn and stretch dough until it won't stretch further. Let relax 5 minutes and then continue to stretch it until it reaches the desired diameter, 10 to 12 inches. Flatten edge of the dough where it is thicker.
Dust pizza peel with light coat of cornmeal. Place pizza on peel. Brush with light coat of olive oil. Spoon on tomato sauce and sprinkle with cheese.
Slide pizza off the peel onto pizza stone. Bake 7 to 10 minutes until cheese is golden and crust has browned. Remove pizza from oven with peel. Rest pizza about 3 minutes before slicing.
Cut each 12-inch pizza into 6 or 8 slices as desired.
Monday, May 11, 2009
Dutch oven macaroni and cheese
I find that it takes about 1-quart cheese sauce to properly moisten 1-pound dry macaroni, when cooked, for macaroni and cheese.
1 pound elbow macaroni
1/2 cup butter
1/2 cup minced onion
6 tablespoons all-purpose flour
2 tablespoons mustard powder
1 teaspoon paprika
2 bay leaves
1 quart milk
2 cups (8 ounces) shredded cheddar cheese
2 cups (8 ounces) shredded Monterrey jack cheese
1/2 cup shredded Asiago cheese
Kosher salt and while pepper, to taste
2 cups croutons, crushed
Cook macaroni according to package directions at home. Drain water. Cool macaroni in cold water. Package in zipper-top bag and refrigerate.
If desired, Melt butter in a 12-inch Dutch oven over medium heat. Add onion and sweat until soft. Do not brown onions or butter. Blend in flour, mustard, paprika and bay leaves. Cook until mixture is smooth and buddly.
Gradually add milk, whisking constantly. Cook sauce over medium heat, stirring constantly. Simmer 5 to 10 minutes while stirring until smooth. Gradually mix in cheese. Stir over low heat until cheese is melted. Season to taste with salt and pepper.
Add pasta to sauce and mix thoroughly. Top with croutons. Place lid on Dutch oven and bake approximately 25 to 30 minutes with coals for 350 degrees. Serves 10 to 12.
Saturday, May 10, 2008
Grilled cheese for a birthday girl
 I'm sitting in my mother-in-law's easy chair, listening to my son- and brother-in-law fix the screen door (the one that I walked through earlier), watching three grandchildren play on the floor. Both the birthday girl, who's one today, and last month's birthday boy are walking.
Life can't get much better!
In honor of Nevaeh's birthday, her mother and I prepared a quick dinner with grilled cheese sandwiches. The adults had grilled cheese with asparagus and roasted red peppers. Farm-fresh asparagus and roasted red peppers (either from a jar or freshly roasted) gave the adults a nice grown-up sandwich. I made grilled cheddar cheese sandwiches for the children.
GRILLED CHEESE SANDWICHES WITH ASPARAGUS AND ROASTED RED PEPPERS
 I clipped this recipe from one of my food service trade journals several years ago. It makes enough for 12 sandwiches.
2 pounds asparagus
1 cup prepared balsamic-garlic-olive oil vinaigrette
12 ounces sliced fontina cheese
16 ounces sliced fresh mozzarella cheese
2 cups roasted red peppers
1 cup fresh basil leaves
24 slices sourdough bread, brushed with extra virgin olive oil
To prepare asparagus, gently cook in simmering water for two or three minutes. Then submerge asparagus in a waiting bowl of ice water. Remove, drain and toss with vinaigrette. Let stand covered and refrigerated at least two hours before using.
Lay 12 slices of bread on clean, flat surface. Top each slice with (in order):
2 slices fontina
3 marinated, drained spears asparagus
3-4 fresh basil leaves
2-1/2 tablespoons red pepper pieces
2 slices mozzarella
Top with second slice of bread. Cover and reserve. Heat a large heavy skillet over medium heat and griddle sandwiches on both sides until golden brown. Transfer to a sheet pan and warm in 350-degree F. oven 8 to 10 minutes or until heated through.
Cut each sandwich on the diagonal to serve. Serve any remaining marinated asparagus with the sandwiches.

Saturday, October 07, 2006
Feeding the Soul and Body
This weekend is the annual lectureship for the Pollock Pines-Camino Church of Christ at its building in Camino, California. Don Truex, an evangelist who serves a church in Temple Terrace, Florida, is preaching a series of five lessons on "The Christian in a Secular Culture."
He lead this morning's first lesson with this scripture:
Christians are sanctified "in the truth," that is through the word of God. We the follow the word that instructs "us to deny ungodliness and worldly desires and to live sensibly, righteously and godly in the present age ... (Titus 2:12)." We are "kept from the evil one" as we jealously follow the pattern of life as sent forth in the word.
Feeding the body
After listening to two lessons from brother Truex, the congregation adjourned to one of the houses for a pot luck lunch. Since I've been batting one of those knock-down colds, I had not taken the time to prepare a dish for the meal.
The head of cauliflower that was languishing in the produce crisper made the perfect dish for the pot luck. I was able to prepare roasted cauliflower with caramelized onions in about 45 minutes to one hour as we were getting ready to attend the services.
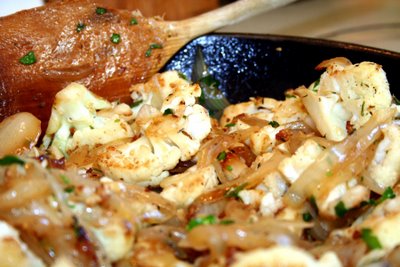
ROASTED CAULIFLOWER WITH CARAMELIZED ONIONS
There is no recipe for this dish. Like my recipe for roasted cauliflower with gorgonzola from vacation last July, this is one of those side dishes that came together as I cooked. It reminded me of french fried cauliflower, a dish that we often prepared in Navy galleys in the 1970s.
To get started, cut a head of cauliflower into flowerets. I like to cut the head in quarters and then slice each quarter into 1/2-inch slices. This gives you nice flat surfaces that easily brown.
Cut a large yellow onion into this slices. Set a cast iron skillet over a medium flame to pre-heat. When hot, pour a couple tablespoons of extra virgin olive oil in the oven. Cook the onion, stirring frequently, until caramelized, about 10 to 15 minutes. Adjust the heat as needed to avoid burning. Remove caramelized onion to a bowl.
See my blog on Saturday morning breakfast for my thoughts on caramelizing onions.
Add more olive oil to the skillet. Add the cauliflower and watch the heat. Too much and you'll burn everything. Too little and you'll be in the kitchen all night.
With the flame adjusted properly, it'll take 5 to 10 minutes to see the cauliflower change color. At first the flowerets will turn a creamy yellow. Then as you stir and toss, the peaks will turn to a golden brown.
Be patient. This part takes time (a half-hour or more) to thoroughly brown the cauliflower. Turn the heat down a notch if it's browning too fast. Give it a small boost if nothing's happening.
What you're looking for is a rich golden brown color and nutty aroma. When brown, leave the cauliflower in the skillet. Add the reserved onions and stir. Stir in chopped fresh thyme or rosemary and chopped flat-leaf parsley. Season with salt and pepper.
If desired, top the dish with grated Parmesan cheese or crumbled gorgonzola or blue cheese. Bake in a 350-degree oven 10 minutes or until the cheese melts and just starts to brown.
You'll know the roasted cauliflower is done when the nutty aroma wafts up to you.
Enjoy ...
He lead this morning's first lesson with this scripture:
I do not ask You to take them out of the world, but to keep them from the evil one. They are not of the world, even as I am not of the world. Sanctify them in the truth; Your word is truth (John 17:15-17).In the prayer that Jesus offered to His Father on the night of His betrayal, Jesus is asking His Father to guide the Apostles through His word. He didn't ask that they be removed from the world, only that they would be protected from the crafty ways of the devil.
Christians are sanctified "in the truth," that is through the word of God. We the follow the word that instructs "us to deny ungodliness and worldly desires and to live sensibly, righteously and godly in the present age ... (Titus 2:12)." We are "kept from the evil one" as we jealously follow the pattern of life as sent forth in the word.
Feeding the body
After listening to two lessons from brother Truex, the congregation adjourned to one of the houses for a pot luck lunch. Since I've been batting one of those knock-down colds, I had not taken the time to prepare a dish for the meal.
The head of cauliflower that was languishing in the produce crisper made the perfect dish for the pot luck. I was able to prepare roasted cauliflower with caramelized onions in about 45 minutes to one hour as we were getting ready to attend the services.

ROASTED CAULIFLOWER WITH CARAMELIZED ONIONS
There is no recipe for this dish. Like my recipe for roasted cauliflower with gorgonzola from vacation last July, this is one of those side dishes that came together as I cooked. It reminded me of french fried cauliflower, a dish that we often prepared in Navy galleys in the 1970s.
To get started, cut a head of cauliflower into flowerets. I like to cut the head in quarters and then slice each quarter into 1/2-inch slices. This gives you nice flat surfaces that easily brown.
Cut a large yellow onion into this slices. Set a cast iron skillet over a medium flame to pre-heat. When hot, pour a couple tablespoons of extra virgin olive oil in the oven. Cook the onion, stirring frequently, until caramelized, about 10 to 15 minutes. Adjust the heat as needed to avoid burning. Remove caramelized onion to a bowl.
See my blog on Saturday morning breakfast for my thoughts on caramelizing onions.
Add more olive oil to the skillet. Add the cauliflower and watch the heat. Too much and you'll burn everything. Too little and you'll be in the kitchen all night.
With the flame adjusted properly, it'll take 5 to 10 minutes to see the cauliflower change color. At first the flowerets will turn a creamy yellow. Then as you stir and toss, the peaks will turn to a golden brown.
Be patient. This part takes time (a half-hour or more) to thoroughly brown the cauliflower. Turn the heat down a notch if it's browning too fast. Give it a small boost if nothing's happening.
What you're looking for is a rich golden brown color and nutty aroma. When brown, leave the cauliflower in the skillet. Add the reserved onions and stir. Stir in chopped fresh thyme or rosemary and chopped flat-leaf parsley. Season with salt and pepper.
If desired, top the dish with grated Parmesan cheese or crumbled gorgonzola or blue cheese. Bake in a 350-degree oven 10 minutes or until the cheese melts and just starts to brown.
You'll know the roasted cauliflower is done when the nutty aroma wafts up to you.
Enjoy ...
Saturday, July 29, 2006
Roasted Cauliflower Gratin with Gorgonzola
 By Thursday evening I knew I had to do something with the head of cauliflower in the cooler. I bought it last Sunday with no recipe in mind.
Then I though that a dish of roasted cauliflower topped with bread crumbs and gorganzola cheese would liven up a dreary day. What better way to brighten to the bland white flowers the cousin of broccoli.
The first time cooked this dish was at my in-law's house. But I've lost the recipe, which I believe came from Fine Cooking. Everyone, including my brother-in-law, loved the dish. It's refreshing nuttiness seemed to be a hit.
Like the pizza rice from Tuesday night, I used the roasted cauliflower to use up a few ingredients that have been lurking in the cooler.
There is no recipe for this dish. This is one of those side dishes that came together as I cooked.
To get started, cut a head of cauliflower into flowerets, about 1/2-inch across. In the meantime, set a 10-inch Dutch oven over a medium flame to pre-heat. When hot, pour a couple tablespoons of extra virgin olive oil in the oven.
Sweat a bit of sliced onion (about 1/2-cup) until translucent. Then add the cauliflower to the onion and stir. Watch the heat. Too much and you'll burn everything.
With the flame adjusted properly, it'll take 5 to 10 minutes to see the cauliflower change color. At first the flowerets will turn a creamy yellow. Then as you stir and toss, the peaks will turn to a golden brown.
Be patient. This part takes time to thoroughly brown the cauliflower. Turn the heat down a notch if it's browning too fast. Give it a small boost if nothing's happening.
What you're looking for is a rich golden brown color and nutty aroma. When brown, leave the cauliflower in the Dutch oven. Stir in some sun-dried tomato pesto (about 1/2-cup) and the juice of one lemon. A tablespoon of chopped fresh oregano or parsley (I didn't have any) will liven the dish.
Top the cauliflower mixture with several hands of bread crumbs. I made my own from the remains of a rustic garlic loaf. It's best to moisten the bread crumbs with a little olive oil.
Then top the dish with crumbled gorganzola cheese and place the lid on the Dutch oven. Scoop a shovel of hot coals (or 20 charcoal briquettes) onto the lid. Bake 10 minutes or until the cheese just starts to brown. You'll know the roasted cauliflower is done when the nutty aroma wafts up to you.
Enjoy ...
Thursday, June 23, 2005
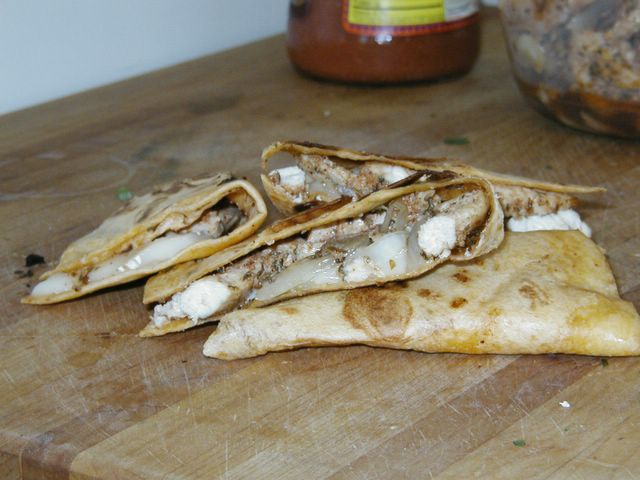
Wisconsin Brie and Chicken Quesadillas
I found this recipe for Wisconsin Brie and chicken quesadillas in the May 2005 issue of Food Management, a trade journal that I receive at work.

I used a jalapeno wrap for the test recipe. I couldn't find red chile tortillas at the local discount market.
WISCONSIN BRIE AND CHICKEN QUESADILLAS
Use the fruit salsa recipe provided or substitute your favorite style. You can also substitute any type of tortilla desired.
4 mangos, peeled, seeded, diced
4 cups jicama, peeled, diced
2 red bell peppers, diced
2 teaspoons cumin
Salt and pepper, to taste
8 tablespoons olive oil
8 teaspoons garlic, minced
4 teaspoons canned chipotle chiles in adobo, pureed
16 ounces chicken breast, julienned
24 ounces Brie
8 tortillas, red
1 cup onion, julienned
8 cilantro leaves, whole
Combine mango, jicama, red pepper, cumin, salt and pepper to create salsa. Set aside in refrigerator. Combine olive oil, garlic and chipotle paste. Rub on Chicken and saute in cast iron skillet over medium heat until done. Set aside.
Remove rind from Brie and discard. Spread Brie on tortillas. Caramelize onions in 4 teaspoons oil. Sprinkle chicken on tortilla and fold over. Heat quesadilla on each side over medium heat until tortilla starts to brown and cheese melts. Garnish with salsa and cilantro sprig.
This recipe is adapted from the Wisconsin Milk Marketing Board.
Subscribe to:
Comments (Atom)
