Showing posts with label culinary tools. Show all posts

Saturday, April 19, 2014

Throwback: Dutch oven trailer at 2005 IDOS spring convention

The Dutch oven trailer was the most impressive piece of Dutch oven equipment at the 2005 Dutch Oven convention in Farmington, Utah. Builder Lynn Benson made the trailer for personal use. A trailer dedicated to cooking made sense to him as Lynn was tired of loading and unloading the pickup each time he cooked in Dutch ovens.

Benson manufactured trailers in Sandy, Utah, at the time. When I talked to him at the convention, the plan was to use trailer as the prototype for a line of cooking trailers. He was still in the process of finishing a smaller version of the trailer during the convention. The trailer was to be known as the Dutch wagon.

Though no longer active, Benson hosted a website to market and sell the trailer for a couple years. It doesn't look like the business took off. I suspect that little demand led to low sales numbers for the trailer. With a niche market, it'd be a tough business pursuit.

Benson's trailer is one of the best ideas for a cooking trailer that I've seen. The trailer featured efficient use of space for a cooking trailer. A chuckbox -- appropriately situated on the back end of the trailer -- provided storage for staples, utensils and supplies. Cooking surfaces on either side of the wagon allowed you to cook in cast iron Dutch ovens, over a gas or charcoal grill and on a two-burner propane stove.

While I doubt that I would ever purchase such a trailer, it intrigued me. Enjoy the photographs from the convention.

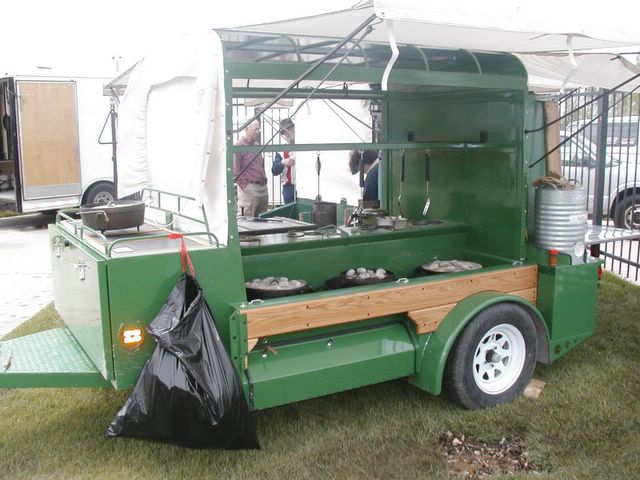
The larger of the two Dutch wagons at the convention. The right side is set up for Dutch oven cooking, with space for several ovens. Propane is stored under the igloo jug. A traditional chuckbox is situated at the rear of the trailer.

The right side of the larger trailer. The trailer is designed so you can drop your own two-burger stove in place -- no need to purchase a new stove. The gas or charcoal grill is located under the silver and green cover.
Like the chuckwagon of cattle drive days, the Dutch Wagon includes a roomy chuckbox at the rear of the trailer.

Sunday, June 23, 2013

Speed racks

I love speed racks. They help my team at Oakland Feather River Camp organize ingredients for the next meal. You'll often hear a cook yell "Coming through" as he moves the rack from the reefer to the hot line for meal production.

Although I don't know where the term comes from, Oakland Camp's two sheet pan racks are in constant use. One is loaded with baked goods. It's stored close to the convection ovens. The second unit is often loaded with prep for the next day. It spends much of the day in the walk-in cooler.

Last Sunday I guided Jesse, a young prep cook at the camp, as he prepared the ingredients for scrambled eggs with mushrooms, tomatoes and spinach for breakfast on Monday. With a short two-hour window to get ready for breakfast, there's no time to prep for the scramble in the morning. Jesse used most of an hour to wash and slice five pounds of mushrooms, dice 20 large tomatoes and open a case of pre-washed spinach.

After the vegetables were cut, he placed a case of eggs (15 cartons each with two pounds of liquid eggs in each carton) on the bottom shelf in the speed rack. Once the potatoes were panned and set on the middle shelves of the rack, Jesse wheeled it into the walk-in.

As Jesse learned last week, speed racks save time in the kitchen. They help the cook move product, cooked and uncooked, from one point to another. And when properly organized, the speed rack allows the cook to perform his job with efficiency and ease.

Tuesday, February 07, 2012

A simple tin can stove project

I remember fussing over my backpacking stove when I was younger. On the Svea Model 123 stove, you were supposed to cup your (hopefully) warm hands around the fuel tank. As the fuel warmed, the small increase in pressure pushed white gasoline up through the burner. Gasoline pooled in a small cup at the base of the vaporizer.

A match lit the gasoline, which warmed the fuel and built pressure in the fuel tank. Just before the gasoline burned out, you opened the valve, pressurized gasoline shot out and caught fire. After a short warm-up period, the burner roared away.

The design worked well. I could light the stove in short order at home, which was less than 500 feet elevation. It proved temperamental on cold mornings over 10,000 feet. The stove would eventually light and burn hot. It just took longer to get it going. I eventually purchased a pump that pressurized the fuel tank in less than a dozen strokes.

Thinking back, the tin can stove would've worked as efficiently as the Svea. My friends and I backpacked in areas with plenty of dead wood on the forest floor. Instead of lugging the stove and a couple fuel bottles on long treks, the home-made stove could've made a suitable replacement.

This stove only functions in areas where you're able to build fires. Some wilderness areas, like the nearby Desolation in Eldorado National Forest, prohibit campfires. You need to carry a stove with extra fuel in these areas.

Where a campfire is permitted, give the stove a try. The narrator in the video says it will boil one or two cups of water within minutes. That's enough for a cup of tea or coffee or water for hot cereal or soup.

If the stove works as promised, it will make a cost-effective alternative to the modern backpacking stoves.


YouTube video description: "A DIY (project) for a portable high efficiency wood gasifier backpacking stove. It is small light and only needs a handful of twigs to boil a few cups of water.

"A great alternative for longer hikes where you don't want to carry lots of fuel."

Tuesday, September 13, 2011

Time honored pot rack

Two words come to mind when I see a pot rack in camp: tradition and practicality. While these words appear unrelated, many implements from our past served a very practical purpose. The pot rack eased the burden of cooking over a campfire and gave the cook an efficient way to control the amount of heat under his pots.

In time camp stoves replaced the pot rack and it passed into the history books and museum collections. Except for s'mores and the occasional grilled steak, the campfire was only used for warmth and comfort. Campers no longer cooked over a campfire.

Yet the traditional pot rack works quite well. In this era of modern technology, it gives the camp cook a practical way to suspend Dutch ovens and coffee boilers over a burning campfire. The pot rack lets the cook organize his cooking pots. It even gives him a place to store utensils.

I enjoy the sense of tradition that comes from a sturdy pot rack. It gives me a connection to thousands of camp cooks, most of whom have gone to their reward. Yes, I use modern camp stoves when nessesary. Cooking over the campfire for a week-long trip to the forest gives me a feel for the history of old cooking methonds and for those who practiced ghe craft.

Monday, September 12, 2011

Code of the campfire #6

The code of the campfire says tool up. The U.S. Forest Service campfire permit says that you "must have a shovel available at the campfire site for preparing and extinguishing campfires." In addition to a shovel, I find that a grill or campfire grate, 18-inch utility tongs and small leaf rake all contribute to successful campfire.

The grill holds pots and skillets over the fire, especially where the Forest Service doesn't provide one. (It seems when I leave the fire grate at home the campground doesn't supply one!) The tongs efficiently arrange burning coals around in the fire. And with the rake, you don't have to use your boot to clear a five-foot area around the campfire.

The second part of the code says leave the campfire site cleaner than you found it. Pick up trash, rake debris from around the fire pit and see that the fire is dead out.

Sunday, February 06, 2011

Top ten tools for the camp kitchen

I originally posted this article to Suite101.com in November 2000.


By now, you've seen that I'm a proponent of anything cast iron, especially camp Dutch ovens. Sure, theye heavy. But nothing beats cast iron. It's versatile, hold heat and cooks evenly. So, it's no surprise that cast iron cookware is king in my camp cooking outfit.

But cast iron isn't the only type of cookware in my camp cooking kit. Over the years, I've put together enough cookware to feed my family of five, plus a few visitors. Although my top ten list only covers cookware, my kitchen outfit includes everything from cookware to water jugs to an extra table or two.

Here’s what I'd carry if I were limited to 10 pieces of cookware:
  • Dutch oven with accessories –– If you only take one piece of cast iron cookware, make it a 12-inch Dutch oven. They're versatile: One-pot meals, bread, biscuits and much more can be cooked in camp ovens. And the lid can even be used as a griddle.
  • Cast iron skillet –– Next to a Dutch oven, a cast iron skillet is a must, especially if you saute, pan-fry and braise your way to flavor-packed camp meals. An eight- to 12-inch cast iron skillet should work for most families. Also buy a tight-fitting lid for your skillet. It helps you cook everything from fried eggs to stews.
  • Coffeepot –– What camp kitchen isn't complete without a hanging coffee pot? There’s nothing better than drinking a cup of your favorite coffee next to the morning campfire. If you don't drink coffee or tea, a coffeepot can be used to boil hot water for other beverages and for the dishes.
  • Fire grate –– A must for campfire cooking. If you enjoy cooking over the campfire like I do, you'll need a sturdy fire grate. Last spring, I purchased a 16-inch by 20-inch grate from Texsport.
  • Pots –– Two-quart and three-quart saucepans should work for most meals in the wild, especially if you take a Dutch oven and skillet. Although you can initially build a camp kitchen with old kitchen pots and pans, it’s wise to eventually invest in quality pots and pans.
  • Stove –– Unless you cook with fire exclusively –– as I do on occasion –– you need a petroleum-fired camp stove. If you have room in your vehicle, I recommend investing in a Camp Chef two-burner propane stove. It sure beats pumping a white gas stove. No more fires, flare ups or worn out generators.
  • Knives –– Unless you’re going to butcher cattle alongside the trail, two or three knives are all you need. I carry a 10-inch French knife, a 6-inch boning knife (to pare vegetables, not strip meat from the bone) and a 12-inch slicer. And, unless you're a gourmet, Henckels and Wusthof don’t have to be part of you cutlery collection. As a professional cook, I’ve used the Connoisseur line by Russell Harrington Cutlery for over 20 years.
  • Utensils –– Okay. I took a little writer's liberty and lumped all utensils into one group. After all, my list would have 30 items if I didn't. Here's the minimum outfit: spatula, solid spoon, slotted spoon, wire whip, ladle, measuring spoons, can opener, potato masher, tongs, cutting board and meat fork. Depending on your cooking style, a few other items are useful. I find that a citrus zester, for example, is a must-have item. I also include an old hand-crank meat grinder, a garlic press and lemon press. But be careful. Things quickly get out of hand when you try to include every gadget that’s listed in the latest Cooking.com catalog.
  • Thermometer –– Using a thermometer is the only way accurately to test for temperature. Get a digital thermometer. They're more accurate and less subject to jarring than the so-called instant-read thermometers. Cooper Instruments and Taylor USA both make thermometers for home and camp use.
  • Kitchen box –– The most important item is a gearbox to hold all this cookware. I've used an Army footlocker for the past decade. I place all of my pots, pans and utensils in the box. Everything has its place. The only thing that doesn't fit is the cast iron.
This list should give you a few ideas to help you build your own kit.

Monday, September 06, 2010

Breakfast, plow disk cooker and Labor Day street fair

I set out this morning just after 8 a.m. to see what was happening at the Diamond Springs Labor Day Bazaar. Since the Firefighter's Association has centered the street fair around Fire Station 49 on the west end of town in recent years, I walked the length of Main Street before encountering any booths or exhibits. I made a straight line for Charlotte's Baker and Cafe for coffee and a morsel or two for breakfast.

I found chef and owner Carolyn Kumpe and crew busy frying torrijas and enpanadas. While I didn't taste the empanadas, they looked good. She filled them with two or three cheeses and served the stuffed pastries with a lively salsa.

After acquiring my obligatory cup of coffee, Carolyn handed me a paper dish with four gently fried torrijas slices . At a dollar a slice, the Spanish-style French toast made for a quick breakfast. From the first bite I knew I'd found a special treat.

Carolyn featured her torrijas with raspberry and orange blossom honey syrup on a Mother's Day special on News10 last May.

Torrijas are traditionally served at breakfast during Easter in Spain. Like traditional American French toast, torrijas is a popular way to use day-old bread. Carolyn used day-old baquettes, cut on the bias, for hers.

While talking to Carolyn, I saw this shallow outdoor pan. Mounted on a 60,000 BTU propane burner, the pan appeared to be a homemade. It's a cross between the shallow chef's sautee pan and a cast iron skillet.

The cooker was constructed to sit securely on the burner. The last thing you want is to accidently dump hot oil onto the burner. It looks like the cooker was made from of a discarded plow disk. The plow disk cooker can be used as a wok, heavy skillet or pan fryer.

I would've loved to hang around and talk to Carolyn and her cooks. But they were busy and I had to get over to the engine house to held the El Dorado Western Railway crew prepare the new Whiting Trackmobile for the parade at 1 p.m. My report on the parade is found at the El Dorado Western Railway blog.

Sunday, February 21, 2010

This old pot


This old pot
Originally uploaded by SeabeeCook
I love these old stockpots. Unlike a new out-of-the-box pot, this one at last week's 1st Annual Hangtown Winter Fest '10 matches the character of many of the competitors.

Rough and unkept on the outside, many are sweet people who have hearts full of kindness on the inside.

The pot's rough exterior -- tarnished from boiling over on top of an untamed propane flame -- shed light on its contents.

Full of simmering water when I shot the picture, I suspect the pot has been used to dissolve salt and sugar for a brine in the past. Or it may be from a lively pot of chili, one that boiled over when the cook's attention turned toward something else.

I didn't get a chance to talk to the owner of the stockpot. I suspect that the team was presenting its entry for beef brisket to the judges when I took the picture.

My only advise to the pot's owner: Please don't clean it exterior. It has too much character to srub it away!

Thursday, February 18, 2010

Broccoli spear cooker

I buy a 24-pound case of broccoli spears from Sysco ever week or two at work. With 12 (2-pound) packages, the case gives me four meals for the residents.

Over my career I've learned that you don't want to dump three packages into a stockpot of boiling water. Half the broccoli will be overcooked. The other half will be underdone

In the fully equipped kitchen, the cook steams the broccoli inside a high-pressure steamer. Since I feed two-dozen residents out of a home-style kitchen, I had to re-think my broccoli cooking process.

As shown in the photograph, I set a steamer up on the range top, as follows:
  • Place 4-inch hotel pan with 1-quart water over two burners
  • Set 2-inch perforated hotel pan inside the 4-inch pan
  • Place 3 (2-pound) packages of broccoli spears inside the pan
  • Cover broccoli with lid or aluminum foil
  • Turn both burners on high and steam broccoli for 5 to 10 minutes; reduce heat to medium once the water boils
  • Gently separate broccoli spears with a pair of tongs
  • Continue cooking until done

The 2-inch hotel pan next to the broccoli is baked macaroni and cheese.

Thursday, November 05, 2009

Army field range burner for sale on eBay

I occasionally receive email from readers of this blog who're looking for surplus military field feeding equipment. This burner -- know as the M2A burner unit in military parlance -- is being sold on eBay through its "Buy it Now" feature for $140. The seller has two units for sale.

Sunday, September 06, 2009

Military field range stockpots

Tom sent me a picture of the 15- (left) and 10-gallon stockpots for the M59 field range. The smaller pot is designed to fit inside that larger pot, thus creating the perfect double boiler.

This picture shows the 10-gallon pot nesting inside the 15-gallon pot. Note the cradle, which steadies the pot as you slide it in and out of the field range cabinet.

Field range gasoline burner

As one who used the military field range burner for 20 years in the U.S. Navy Seabees, I initially expressed concern when Tom asked the readers of the Royal Tine camp cooks forum for advise on his M59 field range outfit. I know from first hand experience that the gasoline-powered burner can be deadly when misused.

I advised Tom to not use the burner. In its place I suggested that he to rig a propane burner in the frame of the military M2 burner.

Tom assured me that he's proficient in the operation of the burner. "I have used the burners keeping a close eye on the pressure gauge," said Tom. He explained that he will shut the burner down when the fuel tank pressure climbs above the green zone, a practice that we follwed in the Seabees.

"I worked in the place that made (the field range) before the Army changed" to the new multi-fueled burner, said Tom. He acquired the "double pots, whisk, ladle, serving spoon, strainer, and the pot rack from where I worked" by asking the owner, who gave the equipment to him.

Tom was able to purchase two new-in-box burners from a military surplus dealer. He later purchased the roasting pan and 10- and 15-gallon stockpots to complete the field range.

Thursday, September 03, 2009

Double boiler set up in the military field range

I recently answered a question from a former Pennsylvania National Guard soldier about his U.S. Army surplus M59 field range.

Tom currently uses the M2A gasoline burner inside the field range cabinet to heat a large pressure cooker while canning food (pictured to left).

"I have been using this set up for canning," said Tom on the Royal Tine camp cooks forum. The benefit is "no heat and little mess in the kitchen."

Tom would like to use the large 10- and 15-gallon stockpots to make "gallons of tomato sauce at one time." He asked Royal Tine readers how to use the double boiler.

The answer to Tom's dilemma comes from the April 1996 edition of the Army Field Manual 10-23: "When you need a double boiler, put 21 liters (22 quarts) of water in the 60-quart pot. Place the pot in the cradle. Put a 40-quart pot in the 60-quart pot and then cover the 40-quart pot."

A double boiler is used to cook delicate sauces, soups and chocolate dishes that easily burn under direct heat.

Although the cook can buy specially manufactured double boilers, any two pots can be used as long as they nest together. In the field range, the 10-gallon pot is designed to nest inside the 15-gallon pot. .

Water level is poured into the larger pot to just under the bottom of the smaller or upper pot. Boiling water shouldn't touch the smaller pot.A tight-fitting upper pot prevents steam from escaping

The two stockpots were part of the standard outfit with the field range. Modern equipment has since replaced the M59 in U.S. military field kitchens.

Note: I'll post a picture of the military double boiler as soon as I can acquire one.

Saturday, August 29, 2009

Saga of the Deer Crossing oven, part 3

Relief came during the first week of Session 2. Jim called RJB Gas Plumbing Service, a local El Dorado County gas plumber. Owner Roy, a man my age with over 30 years experience, quickly discovered the problem and repaired it.

Roy said that Deer Crossing's oven was in better condition that two well-known El Dorado County eateries, both restaurants that Debbie and I have enjoyed. Roy brought me up-to-date on happenings in local establishments while he repaired the oven pilots and cleaned both burners.

Costly parts precluded replacement of both thermostats. I told Jim that I could live without a thermostat for the season as long as the ovens worked. I manually adjusted the oven temperature for the remainder of the summer.

I put both ovens to the test one day later during my third pizza night of the season. "The oven worked beautifully -- no flame-outs -- took 12 to 15 minutes for each batch," I wrote in my notebook.

As I often did throughout the summer, I expressed my relief in words. With 26 (12-inch) pizzas to bake that evening, pizza night had the potential of being a disaster.

"Music to my ears," I wrote with a feeling of liberation. "I lit both ovens and after a momentary pause, both burners went 'whoosh' as they're supposed to do -- the infamous DCC oven has been conquered!"

I wrote that note on Thursday, July 9, my last recoded comment regarding the ovens for the summer. Three weeks into my summer job the problem was solved.

Deer Crossing Camp's most important piece of culinary equipment was in top shape. Many thanks, Jim!

Thursday, August 27, 2009

Saga of the Deer Crossing oven, part 2

The first big test for the ovens came on the first of eight pizza nights. I couldn't go one meal without re-lighting the oven pilot. Many meals I had to re-light it one or two times.

The process to light a pilot was cumbersome at best. I knelt down, pushed the pilot button down with my left hand and shoved the stick lighter up next to the pilot.

My hand cramped as I depressed the red button. And I couldn't release it because it it took a minute or more to heat the pilot to a point where it'd stay lit.

In the 35 to 40 minutes it took to bake a cake, I was usually on my knees three or four time making sure the burner was still burning. The pilot had to be re-lit once just to bake the cake.

Jim must've sensed my frustration with the whole process. I talked to him about the ovens daily with the hope that he'd locate the technical manual and repair the oven.

But there was no manual to be found on-line. Jim expressed his reluctance to tinker with adjusting the pilot. Although as the camp director, Jim has trained himself to maintain the camp, he had never tackled the oven.

Trepidation surfaced as I approached the first pizza night. Both ovens had to heat to 500 degrees for an hour or more as I baked 20 (12-inch) pizzas. The only way the meal would be successful was to have two ovens that worked perfectly.

"Both ovens handled reasonably well," I recorded in my notebook with some relief. "I had to manually light the left oven -- it worked all evening." Although the right oven eventually gave out, disaster was adverted that night.

To manually light the burner (or bypass the pilot), I jammed the stick lighter up against the burner and turned the oven dial to 350 degrees. Flame slid down the burner after a 10-second pause.

This was the only time that I successfully lit the burner in this manner. I tried unsuccessfully one other time. Safety concerns (like burning all hair off my head and face) restrained me from trying the unsafe method any more.

The right oven gave me more fits that first pizza night. "(It) gave out on me twice and I couldn't re-light it after the second time," I wrote.

That means that I went to me knees -- a physically challenging move for this fifty-something chef -- and once again jammed the stick lighter up against the pilot and start the process over. Fortunately, I was able to finish baking the pizza in the left-hand oven.

To be continued ...

Sunday, August 23, 2009

Saga of the Deer Crossing oven

Two events made life in the Deer Crossing Camp kitchen easier this summer. Debbie's constant companionship was a great comfort to me during her seven-week stay.

She was a constant companion (as I reported here), one with whom I could talk and find solace. Even when we were in different rooms in the lodge, just knowing that she was present. I always knew that I'd see her in a little while and we'd be able to talk.

I can't imagine what this summer would've been like of Jim hadn't allowed Debbie to join me. Each work week would've felt much longer than the sum of its six days. Her presence relieved my mind of endless waiting for my next day off, a wait that would've been marked by loneliness and longing to see her.

I was blessed this summer and I am grateful to the camp's owner and director, Jim Wiltens, for allowing her to stay with me.

The second event had more of a physical impact on my stay at Deer Crossing Wilderness Camp. I discovered early during the training session that the ovens were going to give me fits all summer long.

An early heads up from the camp's 2008 chef in May warned me that the "ovens must be watched carefully for temperature fluctuations." Blake's words came true on Tuesday of my second week at camp.

I served caramelized chicken (chicken breasts basted with a soy-catsup-honey sauce that caramelized in the oven) and mashed potatoes with apple crisp that evening to the 15 staff at camp for training. I had to re-light each oven four or five times. The pilot seemed to blow out each time the burner cycled off.

I wasn't able to brown the crisp topping to a nice, even golden color. Jim and I talked about the ovens that night – this first of many conversations over the next two weeks.

From that first conversation we looked for solutions. Jim searched for a technical manual for the Imperial brand oven on the Internet, but never found one. Neither Jim nor I were willing to play with the oven's settings without some technical guidance.

The problem calmed down during the remainder of the training week. I didn't record anything in my notebook for the until the first pizza night during Session 1. Once I learned to handle the oven with care, like gingerly opening and closing the oven door, the problem seemed to go away for a few days.

To be continued ...

Sunday, June 28, 2009

Mandoline vs. mandolin

I just learned this afternoon that I've been misspelling mandoline at 'Round the Chuckbox. While you slice potatoes (and other produce) on a mandoline, Doc Mercer won't play one with his Cumberland Highlanders band.

Drop the "e" and you have Doc's favorite muscical instument, the mandolin.

Whishbone, a camp cook from the neighborhood of Wichita, Kansas, posted this request at Camp-Cook.com last Thursday:
Anyone ever use one & what type do You Like. I looking at Pampered Chef ones on eBay. Son & I need to cook up a bunch of potatoes (augratin style) for 28 Girl Scouts, Leaders & Parents the last Meal at Local summer Camp. Wishbone-Ks
Stick with a simple mandoline, one that cuts without all the "bells and whistles." I purchased a top-line model at a local restaurant supply several years ago (pictured below). It works well enough, but it's heavy, a bit clunky and the safety guard is doesn't flow smothly.

I wouldn't spend more than $40 or 50. I spent about $200 and now wish that I had purchased an economy model. They do the same thing for much less. I found an Oxo V-blade model on Amazon for $40 (pictured at left).

Either way, Wishbone, a mandoline is a worthy investment if you plan to do any camp cooking for large groups. A sharp one will quickly cut a load of potatoes for scallops or au gratin.

I used mine at camp yesterday to cut cucumbers for the cuke and onion salad for today. I had the job done in 10 minutes with nice, thin slices of cucumber.

I don't care how good you are with a knife, a mandoline just makes good sense for the camp kitchen.

I wrote a safety brief on the use of a mandoline in the kitchen last year. Mandoline safety is serious business in the kitchen. Properly used, they are a great time saver and help you produce professional looking products. In the wrong hands, you'll be spending a lot of time in the emergency ward.

Remember: Doc Mercer plays great Bluegrass tunes on his mandolin as I slice potatoes for scallops on my mandoline.

Wednesday, June 10, 2009

Culinary toolbox

Last March, I posed this question on the Christian Chefs Forum:
If you can only carry six culinary tools, what would they be? I'm looking for hand-held tools, not pots, pans, skillets, etc.
My thought was to canvas chefs who customarily carry the tools that they can't work without. These are chefs who have a lot of experience walking into poorly-equipped kitchens.

Like a carpenter who brings his own tools to the jobsite, I often carry a wide selection of culinary tools when I work in an unfamiliar kitchen. It's frustrating to walk in a kitchen -- especially one that you've never seen -- and find out that there are no tongs anywhere.

After receiving input, I composed the following list:
  1. Knives--I never leave home without my knife roll; it includes French, slicer, bread and boning knives plus a steel
  2. Tongs--I use tongs for everything: pick up food, stir a saute or sweat or baste chicken breasts in a skillet
  3. Dough cutter--Outside of tongs, this is the best all-around tool; I use it for scraping, cutting dough, picking up chopped vegetables, etc.; it double as a spat in a pinch
  4. Digital thermometer--A necessity; every chef should own one or more quality thermometers
  5. Scoops or dishers--I love dishers and keep a bunch in my utensil drawer at home; essential sizes include #8, 12, 16, 24 and 30; they're good for portioning out meatballs or cookies and can be used to measure ingredients in a pinch
  6. Whisk--I rarely find a decent whisks in kitchens
My original intent was to put together a short list of tools that I could pack in my duffel bag. While shopping the other day, I changed direction. I purchased a sturdy Craftsman 20-inch toolbox with liftout tote tray.

Over the weekend, I packed a wide selection of tools into the toolbox. While compact, the toolbox has sufficient room in the tub to hold everything that I need. The tote tray holds all the small items.

I figure that I can leave the toolbox in the truck if necessary and recover it later in the week. My knife roll is already packed in my duffel bag. All I'll have to do is stuff the scale, dough cutter, thermometer and one or two other tools in the bag for the trip across the lake.

Tuesday, May 19, 2009

Cooking trailer for sale in Kentucky

I reveived this email from Biscuit the other day. Friends of a longtime Yahoo Dutch Oven Cooking group member Jim Harper are selling his cooking trailer. Know as Tapscrew to his friends, Jim passed from this life on February 5, 2009.

Although I didn't know Jim, he must've been a great camp cook.


Photographs of the trailer are posted here.

Here's Biscuit's description of the trailer:

My friends in Kentucky are selling Tapscrews cooking trailer. Below is a discription of trailer.

Please contact Biscuit at n5hbb@yahoo.com for more information and photos.

The price is $1,500.

Trailer Description

This customer cooking trailer is 5' x 8'. It has rear stabilizers on both sides, is wired for light and ready to travel. It is made of water resistant material and can be removed from the trailer for storage.

Cook prep area is 6' in length with a sink and side counter. Also a fifteen-gallon water tank with a battery operated pump to move water from storage to sink. Waste is collected under trailer and can be dumped.

There is storage for all things Dutch Oven, pots, fires buckets (not included). There is also room for tents, chairs, and other large items. The trail is new, used only 3 times.

Chuck wagon boxes: 3 different boxes

Box measures: 30" (w) x 13" (d) x 24" (h). Drop in lids form the closure for the box. Inside of lid is covered with Formica to provide added work space. One box has storage for dry goods, while another has storage for utensils. Boxes are made of beautiful wood with handles for easy transport.

Biscuit

Monday, March 23, 2009

Top six culinary tools

I posed this question on the Christian Chefs Forum last Friday:

If you can only carry six culinary tools, what would they be? I'm looking for hand-held tools, not pots, pans, skillets, etc.
My thought was to canvas chefs who customarily carry the tools that they can't work without. These are chefs who have a lot of experience walking into poorly-equipped kitchens.

Like a carpenter who brings his own tools to the jobsite, these chefs compensate by carrying carefully selected tools that make the job easier. It's frustrating to walk in a kitchen -- especially one that you'll only use for one or two meals -- and find out that there are no tongs anywhere.

I have a personal motive for asking the question. Last week, I accepted a job at a summer camp. Since camp will be covered in snow until April or May, I can't run up and check out the kitchen. Even though the camp is located close to my home, I may not be able to do so until the day I report.

The situation is further complicated by the fact that the camp is located two miles from road's end. I have to be ready to carry the tools that I can't be without on my back.

Anything that I take must fit into a small boat (along with personal baggage, Bible and books, camera, etc.). I have to be ready to shuttle my gear into the camp over a two-mile long trail.

Here's my list:

  1. Knives--I never leave home without my knife roll; it includes French, slicer, bread and boning knives plus a steel
  2. Tongs--I use tongs for everything: pick up food, stir a saute or sweat or baste chicken breasts in a skillet
  3. Dough cutter--Outside of tongs, this is the best all-around tool; I use it for scraping, cutting dough, picking up chopped vegetables, etc.; it can use as a spat in a pinch
  4. Digital thermometer--A necessity; every chef should own one or more quality thermometers
  5. Scoops or dishers--I love dishers and keep a bunch in my utensil drawer at home; essential sizes include #8, 12, 16, 24 and 30; they're good for portioning out meatballs or cookies and can be used to measure ingredients in a pinch
  6. Whisk--I rarely find a decent whisks in kitchens
Three chefs responded to my inquiry. Ira and Tyrone both said he'd carry a chefs knife, steel, tongs, wooden spoon, thermometer and immersion blender. These are common items, many are on my list as well.

Bryguy's list was tailored to his cooking style. He included a French knife, vegetable peeler, pastry bag with star tip, spoon, whisk and food processor.

The immersion blender is a necessity if you make a lot of sauces and dishes with pureed ingredients. Even though I could consider it a nice-to-have tool, I probably won't need on this summer.

Tyrone suggested he'd carry a cutting board. That made sense because you want to protect your knives. What better way to do so than with a cutting board that fits your needs. For seven years I carried my heavy Boos block to FC Camp.

Since I drove and could back my truck to the kitchen weight wasn't an issue. I may not be able to take it this year. I suspect that the camp kitchen will have more than one cutting board.

What are your top six culinary tools? Please consider your list and report back by leaving a comment. I'd like to hear what others have to say.