Monday, April 28, 2014

Classic Lodge skillet located at Eagle Point antique shop

Chef Steven and his assistant scramble
eggs in the Daybreak Camp
Lodge 20-inch skillet.
I introduced my perspective on collecting cast iron cookware on these pages some five years ago. A self-imposed spending limit of $100 restrained me from investing hundreds of dollars in cookware that I’d never use. Any new purchase -- mainly cookware capable of feeding a crowd -- had to fill a specific need in my outdoor kitchen. Functionality was my watchword. Any piece must be ready to work, I reasoned. There are no museum pieces in my outfit.

With more than two dozen cast iron Dutch ovens and skillets in my modest collection, I saw little need to expand my holdings as I rarely use the entire collection in one setting today. Yet, for some time I’ve felt that one skillet was missing from my collection.

My introduction to Lodge’s heavy 20-inch skillet came in the Daybreak Camp kitchen in 2002. Unknown to me, Lodge had discontinued production of the skillet sometime before I first saw it. For the next seven years I put the camp’s skillet to work frying potatoes and scrambling eggs for one week each July. A pall of sadness fell over me each time I left the skillet on the range for the next group.

I’ve been searching for the skillet since then. A number of leads in the intervening years came up empty, including a call to a Bishop, California, hardware store that forgot to pull its webpage ad after they sold the last unit. Discouraged, search efforts waned over the past five or six years. I felt that I’d missed my chance to ever own one.

Scrambled eggs ready for campers on
Independence Day 2006.
Then, by chance, I found a 20-inch Lodge skillet (model 20SK) Saturday at an Eagle Point, Oregon, antique shop on Saturday. Debbie and I stopped at the Butte Creek Mill to briefly meet fellow Dutch oven cook Ron Clanton of the Rogue River Dutch Cookers. As we waited for Ron, my wife drifted to the antique store, located next to the water-powered grist mill.

Curious as to where Debbie had disappeared, I walked to the antique shop and found her. And I found my skillet! Inside, I saw several cast iron bean pots and skillets. Then the massive skillet jumped out at me as I rounded the corner toward the back of the shop. Its rusty hulk was propped against a vintage piece of furniture. As I inspected the skillet, I immediately realized that I was holding the object of my decade-long search.

The skillet is in decent condition. Though rusted inside and out, there is little pitting on the cooking surface. It looks like most of the rust is on the surface. I should be able to remove it with steel wool and wire brush. It’s my project for the first week of camp, when Debbie and I work alone in the kitchen. Once cleaned, it’ll receive a coat of shortening and an hour-long bake in one of the convection ovens. I’ll give the skillet a test run when the cooks arrive next week.

A rare find, my "new" Lodge 20-inch
skillet needs a bit of elbow grease
and seasoning in a hot oven before
I put it to work.
As it turned out, Ron missed our appointment because he was sick. Yet, the missed opportunity to meet and share our love for outdoor cooking opened into the chance to see the great millworks in Eagle Point and trace of Southern Oregon pioneer history. And I acquired a great piece of cast iron cookware, one that I would’ve missed had Ron been well.

With a $55 price tag, I acquired a great piece of cast iron cookware for well under my price cap. The skillet will serve me well at Oakland Feather River Camp and on the range. The Lodge skillet will certainly feed a crowd. And it’ll soon take center stage on my sauté line, next to 14- and 17-inch Lodge skillets.

Thank you, Ron. I plan to bring the skillet to Eagle Point next November for the annual Gobble ‘Till You Wobble (link takes you to the 2013 event) at the mill. We’ll see you to cook, talk about shared craft and enjoy some wonderful Thanksgiving vittles!

Saturday, April 19, 2014

Throwback: Dutch oven trailer at 2005 IDOS spring convention

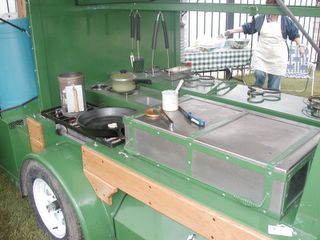
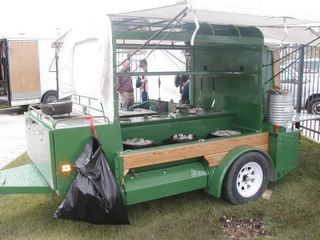
The Dutch oven trailer was the most impressive piece of Dutch oven equipment at the 2005 Dutch Oven convention in Farmington, Utah. Builder Lynn Benson made the trailer for personal use. A trailer dedicated to cooking made sense to him as Lynn was tired of loading and unloading the pickup each time he cooked in Dutch ovens.

Benson manufactured trailers in Sandy, Utah, at the time. When I talked to him at the convention, the plan was to use trailer as the prototype for a line of cooking trailers. He was still in the process of finishing a smaller version of the trailer during the convention. The trailer was to be known as the Dutch wagon.

Though no longer active, Benson hosted a website to market and sell the trailer for a couple years. It doesn't look like the business took off. I suspect that little demand led to low sales numbers for the trailer. With a niche market, it'd be a tough business pursuit.

Benson's trailer is one of the best ideas for a cooking trailer that I've seen. The trailer featured efficient use of space for a cooking trailer. A chuckbox -- appropriately situated on the back end of the trailer -- provided storage for staples, utensils and supplies. Cooking surfaces on either side of the wagon allowed you to cook in cast iron Dutch ovens, over a gas or charcoal grill and on a two-burner propane stove.

While I doubt that I would ever purchase such a trailer, it intrigued me. Enjoy the photographs from the convention.

The larger of the two Dutch wagons at the convention. The right side is set up for Dutch oven cooking, with space for several ovens. Propane is stored under the igloo jug. A traditional chuckbox is situated at the rear of the trailer.

The right side of the larger trailer. The trailer is designed so you can drop your own two-burger stove in place -- no need to purchase a new stove. The gas or charcoal grill is located under the silver and green cover.
Like the chuckwagon of cattle drive days, the Dutch Wagon includes a roomy chuckbox at the rear of the trailer.

Monday, April 14, 2014

Comments on 'Round the Chuckbox

I turned Google+ comments off today on 'Round the Chuckbox. As a result, the original comment form is once again visible at the end of each article. You may post a comment by typing it into the comment box and clicking the publish button. Your comment will be visible as soon as I approve it.

You may have noticed that you were forced to establish a Google+ profile in order to post a comment. This happened when I switched to Google+ comments last September. It sounded nice at the time. However, I quickly learned that the blogger commend mechanism was shut down in the process. Plus I lost the ability to moderate comments.

The most noticeable result of using Google+ comments was the sudden drop in comments. While 'Round the Chuckbox has never inspired a flood of comments, readers have had their moments. Every month or so an article would inspire interactive conversation.

You'll notice that Google+ comments from the last seven months have disappeared. Please return and comment if you'd like to re-join the conversation. Comments on 'Round the Chuckbox are subject to moderation, as they were prior to September. I'll approve comments for publication as quickly as I see them. (Please note that I delete spam and inappropriate remarks.)

Thank you for being a loyal 'Round the Chuckbox reader. I appreciate your readership and would love to see a vibrant exchange of ideas on the blog.

CSCS Steven C. Karoly, USN, Retired
Chef-blogger on 'Round the Chuckbox

Sunday, April 13, 2014

Chicken succotash skillet with kale

Last time I prepared succotash for the pages of 'Round the Chuckbox, it featured Southwestern flavors. Mild poblano chili peppers, pinto and lima beans, tomatillos and whole kernel corn combined in the skillet for an interesting flavor profile. Succotash is a great way to add interest to vegetables at the dinner table.

Though often viewed as a mixture of corn and lima beans, succotash takes its name from Narragansett Indian name for boiled or broken kernels of corn. It has its roots in the Native American cuisine. You could say that any mixture of vegetables is succotash.

I enjoy cooking succotash because of it's versatility. Unless you're looking authenticity, let your culinary creativity be your guide. I often begin with whole kernel corn as my foundation. From there, I add meat or vegetables to create the flavor that I'm looking for. It's also a great way to use leftover meat or vegetables.

I prepared this version last night in my outdoor kitchen. It includes flavors that I enjoy. I've included a series of photos to show you how I prepared the succotash. Remember that you can use any combinations of vegetables you desire. Enjoy ...

This Wagner's 1891 Original reproduction 11-3/4-inch skillet is used for most of stovetop cooking at home. My wife and I purchased it over 30 years ago at a Davis, California, hardware as newlyweds. A vintage Griswold skillet with domed lid is one of my key cast iron pieces in the camping outfit.
You can use any cooked chicken or turkey for the succotash. I sautéed a large chicken breast (about 16 ounces), butterflied, in the skillet over medium-high heat. After a brief rest, the chicken was cubed and set aside.
From this point, each step builds on the last. Crisp 4 ounces bacon over medium-high heat. Push the bacon to one side and spoon out the excess grease. You need about 2 tablespoons of fat for the dish.
Next, 1 onion, diced, and 1 red bell pepper, diced, are tossed into the skillet. Sauté over medium heat until the onion is translucent. Add 2 teaspoons minced garlic and continue cooking for an additional two or three minutes.
Roughly chop 1 bunch of kale. Heap in the skillet. Gently stir into the bacon, onion and pepper mixture, taking care not to spill the kale.
The kale will cook down within 3 to 5 minutes. At this point, watch the heat under the skillet so you don't burn the kale.
Pour 16 ounces of frozen whole kernel corn over the kale mixture. Stir into the onion, pepper and kale mixture, and continue cooking until the corn is hot.
Add the diced chicken to the succotash and stir. Bring the dish to serving temperature and season with salt and pepper to taste.
The finished dish -- chicken succotash skillet with kale. It serves 6 to 8.

Tuesday, April 01, 2014

Campfire cooking with charcoal briquettes

Over 10 years ago, a reader to my former writing project on Suite101.com posed a series of Dutch oven questions. The reader -- named Sheila -- found that the Dutch oven was the ideal piece of camp cookware because it solved a few "camp cooking problems."

Even after summer campfire restrictions were in place, the Dutch oven let her avoid "hot dogs, red meat and a lot of processed foods." She was able to create a myriad of one-pot meals in the three-legged cast iron pot.

Sheila's questions

Camping took her mind off of her ailments, said Sheila. Since she often didn't have the energy to build a campfire, she used charcoal briquettes to cook her meals. "A lot of times I go camping because I’m not feeling well and making a fire, especially learning by trial and error," said Sheila, "is exhausting and time consuming."

Here's her dilemma: "I found that the charcoal briquettes sank into the soft ashes in the fire pit that the state park provides. I’m thinking that next time I’ll put the briquettes into an aluminum cake pan and cook from there."

Sheila believed that charcoal briquettes were a good "way to cook up dinner." She asked:
  1. Can you perk coffee on charcoal briquettes?
  2. Will an old lightweight aluminum coffee pot work?
  3. Can you cook pancakes or eggs on a cast iron griddle over charcoal briquettes?
  4. What types of pots are good on charcoal briquettes in addition to cast iron?
"I’d like to try some cast iron Dutch oven and other types of charcoal briquette cooking using what I have and see if I like it first before getting any special equipment," concluded Sheila. "I was just checking to see if I got some of the beginner’s rules correct."
Cooking with charcoal briquettes
The answer to Sheila's questions was a resounding yes. While I prefer campfire cooking, charcoal briquettes are a good substitute for those times when campfires are banned.

Here are my general rules:

Cooking with charcoal. Charcoal makes a good ready-made source of heat for camping. The briquettes are easy to count and light. And they burn at a predictable rate. Here are four considerations :
  1. Chimney charcoal starter. Don't use lighter fluid to ignite charcoal briquettes. Instead, crumple one or two sheets of newsprint in the bottom compartment of a chimney charcoal starter and light. You'll have gray ash-covered coals in about 20 minutes.
  2. Heat control. Control the heat by adding and removing burning briquettes. This takes practice. Start by placing a thick field of briquettes under the skillet or pot. Then watch the food. If it's cooking too fast, remove briquettes with a pair of tongs. Add burning briquettes if the food is cooking too slow. And, yes, Sheila can brew coffee in the aluminum coffee pot and fry breakfast on the cast iron griddle.
  3. Fire safety. You need nearby water source to douse any fires. Purchase a galvanized steel bucket and ash shovel to collect spent briquettes. Drown spent coals inside the bucket. When all fires have been extinguished, discard the ash and briquettes. 
  4. Wind shield. Charcoal briquettes burn hotter and faster under windy conditions. In a brisk wind, coals that normally burn for 60 minutes may evaporate within 30 to 45 minutes instead.
Use a firepan. It's important to protect the environment and to guard against wildland fires. Any fireproof implement can be turned into a firepan. Set a baking sheet (or any iron or steel sheet) between two or more bricks to hold the coals. You can also cook in a kettle-style barbecue. You'll need to elevate the pots and pans two to three inches above the coals.

Cookware. Any cookware can be used when cooking over a charcoal fire. However, don't place burning charcoal briquettes directly on top of any cookware that isn't cast iron. Conversely, don't set anything directly on the briquettes. Thin-skinned cookware (like aluminum) will warp. And enamel pots can burn and chip. Either suspend pots over the coals with a chain or use a grill to hold them two to three inches above the fire.

After our conversation on Suite101.com, Sheila purchased several fireproof bricks at a local brickyard and a pizza sheet and grill at a secondhand store. She planned to suspend the grill between two bricks, about two and one-half inches above the charcoal. After setting the pizza sheet on top of one or two bricks, she said that she'd burn the charcoal directly on the pizza sheet.